
 Soy Oscar Mas y hoy me gustaría enseñaros que es Registry y como integrarlo con nuestra plataforma de Kubernetes.
Un Registry es un almacén que imágenes docker, las cuales podremos distribuir en nuestros servidores de Kubernetes. Esto es útil, ya que muchas veces podemos encontrarnos que no existe el contenedor que nosotros queremos o simplemente queremos hacernos un contenedor a medida con nuestro propio software y posteriormente usar esa imagen que hemos creado en nuestro sistema de Kubernetes.
El esquema lógico sería el siguiente: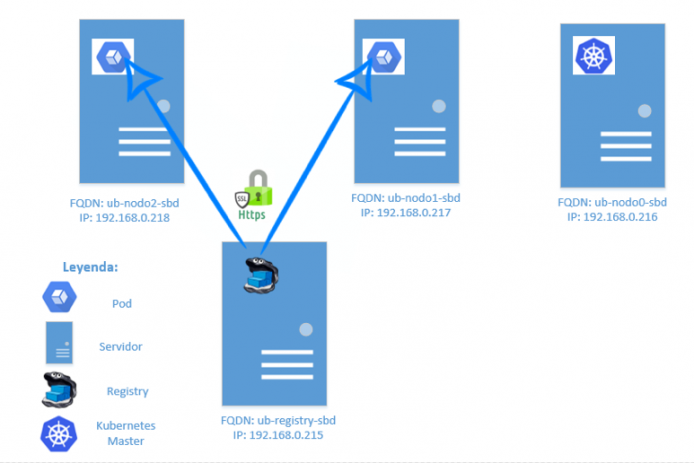
La gran complejidad de este montaje son los certificados. Para este tipo de montaje he usado un certificado autogenerado en el servidor de Registry (ub-registry-sbd) y una vez generado, se lo entregaremos a los servidores de Kubernetes para que confíen en dicho certificado, de esta forma cuando despleguemos un contenedor desde nuestro servidor de Registry, el tráfico estará encriptado. También se le añade un usuario y contraseña para poder acceder al Registry, el cual lo almacenaremos en el Secret de Kubernetes.
Para empezar instalaremos las herramientas de apache, que posteriormente nos permitirán crear el usuario y el password para nuestro Registry:
root@ub-registry-sbd:~# apt-get update && apt-get -y install apache2-utils
Crearemos el contenedor del Registry y el nginx de la siguiente manera:
root@ub-registry-sbd:~# cd /etc/docker-registry/
root@ub-registry-sbd:/etc/docker-registry# cat docker-compose.yml
nginx:
  image: "nginx:1.9"
  ports:
    - 443:443
  links:
    - registry:registry
  volumes:
    - ./nginx/:/etc/nginx/conf.d
registry:
  image: registry:2
  ports:
    - 127.0.0.1:5000:5000
  environment:
    REGISTRY_STORAGE_FILESYSTEM_ROOTDIRECTORY: /data
  volumes:
    - ./data:/data
Ir con cuidado con server_name ub-registry-sbd.ilba.cat;, ya que este FQDN ha de coincidir con el nombre del certificado que crearemos más adelante.
root@ub-registry-sbd:/etc/docker-registry# cat nginx/registry.conf
upstream docker-registry {
  server registry:5000;
}

server {
  listen 443;
  server_name ub-registry-sbd.ilba.cat;

  # SSL
  ssl on;
  ssl_certificate /etc/nginx/conf.d/domain.crt;
  ssl_certificate_key /etc/nginx/conf.d/domain.key;

  # disable any limits to avoid HTTP 413 for large image uploads
  client_max_body_size 0;

  # required to avoid HTTP 411: see Issue #1486 (https://github.com/docker/docker/issues/1486)
  chunked_transfer_encoding on;

  location /v2/ {
    # Do not allow connections from docker 1.5 and earlier
    # docker pre-1.6.0 did not properly set the user agent on ping, catch "Go *" user agents
    if ($http_user_agent ~ "^(docker\/1\.(3|4|5(?!\.[0-9]-dev))|Go ).*$" ) {
      return 404;
    }

    # To add basic authentication to v2 use auth_basic setting plus add_header
    auth_basic "registry.localhost";
    auth_basic_user_file /etc/nginx/conf.d/registry.password;
    add_header 'Docker-Distribution-Api-Version' 'registry/2.0' always;

    proxy_pass                          http://docker-registry;
    proxy_set_header  Host              $http_host;   # required for docker client's sake
    proxy_set_header  X-Real-IP         $remote_addr; # pass on real client's IP
    proxy_set_header  X-Forwarded-For   $proxy_add_x_forwarded_for;
    proxy_set_header  X-Forwarded-Proto $scheme;
    proxy_read_timeout                  900;
  }
}
Crearemos el usuario que tendrá acceso al Registry mediante las herramientas de apache que hemos instalado al principio del post:
root@ub-registry-sbd:/etc/docker-registry# cd nginx/
root@ub-registry-sbd:/etc/docker-registry/nginx# htpasswd -c registry.password oscarmas
Ahora crearemos el certificado, ir con cuidado con la parte:
Common Name (e.g. server FQDN or YOUR name) []:ub-registry-sbd.ilba.cat, ya que el FQDN que indiquemos, ha de coincidir con nuestro fichero de apache que hemos puesto anteriormente y será el que usemos para acceder al sistema de Registry.
root@ub-registry-sbd:/etc/docker-registry/nginx# openssl genrsa -out devdockerCA.key 2048
root@ub-registry-sbd:/etc/docker-registry/nginx# openssl req -x509 -new -nodes -key devdockerCA.key -days 20000 -out devdockerCA.crt
root@ub-registry-sbd:/etc/docker-registry/nginx# openssl genrsa -out domain.key 2048
root@ub-registry-sbd:/etc/docker-registry/nginx# openssl req -new -key domain.key -out dev-docker-registry.com.csr
root@ub-registry-sbd:/etc/docker-registry/nginx# openssl x509 -req -in dev-docker-registry.com.csr -CA devdockerCA.crt -CAkey devdockerCA.key -CAcreateserial -out domain.crt -days 20000
Ahora que lo tenemos todo preparado para poder empezar a desplegar los contenedores, necesitamos instalar docker. En este caso, la versión de docker que instalemos es irrelevante. El paquete de docker, en Ubuntu se llama docker-engine, a consecuencia de que anteriormente a docker, ya existía un software llamado docker en los repositorios de Ubuntu:
root@ub-registry-sbd:~# apt-key adv --keyserver hkp://p80.pool.sks-keyservers.net:80 --recv-keys 58118E89F3A912897C070ADBF76221572C52609D
root@ub-registry-sbd:~# echo "deb https://apt.dockerproject.org/repo ubuntu-xenial main" > /etc/apt/sources.list.d/docker.list
root@ub-registry-sbd:~# apt-get update && apt-get install -y docker-engine
root@ub-registry-sbd:/etc/docker-registry/nginx# mkdir /usr/local/share/ca-certificates/docker-dev-cert
root@ub-registry-sbd:/etc/docker-registry/nginx# cp devdockerCA.crt /usr/local/share/ca-certificates/docker-dev-cert
root@ub-registry-sbd:/etc/docker-registry/nginx# update-ca-certificates && systemctl restart docker
Instalaremos docker-compose, para posteriormente poder desplegar los dos contenedores. Recordar que el contenedor de apache nos permitirá el acceso al Registry mediante el certificado que hemos creado y nos validará nuestras credencias al acceso al Registry:
root@ub-registry-sbd:/etc/docker-registry/nginx# apt-get install -y docker-compose
Arrancaremos el Registry mediante el compose, el cual se descargará las correspondientes imágenes del Registry y del Nginx y posteriormente verificaremos que no nos salga ningún error:
root@ub-registry-sbd:/etc/docker-registry/nginx# cd ..
root@ub-registry-sbd:/etc/docker-registry# docker-compose up
Una vez verificado que no hayan errores, crearemos el servicio del Registry para que en futuros reinicios del equipo nuestro sistema de Registry siga funcionando:
root@ub-registry-sbd:/etc/docker-registry# cat /etc/systemd/system/docker-registry.service
[Unit]
Description=DockerRegistry
After=docker.service
Requires=docker.service

[Service]
WorkingDirectory=/etc/docker-registry
ExecStart=/usr/bin/docker-compose up

[Install]
WantedBy=multi-user.target

root@ub-registry-sbd:/etc/docker-registry# systemctl daemon-reload
root@ub-registry-sbd:/etc/docker-registry# systemctl start docker-registry
root@ub-registry-sbd:/etc/docker-registry# systemctl enable docker-registry
Verificaremos que el acceso al Regisrtry sea correcto:
root@ub-registry-sbd:/etc/docker-registry# docker login https://ub-registry-sbd.ilba.cat
Copiaremos los certificado a los equipos que han de recibir la imagen que hemos creado en nuestro Registry:
root@ub-nodo2-sbd:~# mkdir /usr/local/share/ca-certificates/docker-dev-cert
root@ub-nodo2-sbd:~# scp ub-registry-sbd:/usr/local/share/ca-certificates/docker-dev-cert/devdockerCA.crt /usr/local/share/ca-certificates/docker-dev-cert/
root@ub-nodo2-sbd:~# update-ca-certificates && systemctl restart docker
Volveremos a verificar que podemos acceder desde los diferentes servidores:
root@ub-nodo2-sbd:~# docker login https://ub-registry-sbd.ilba.cat
Ahora que ya tenemos nuestro sistema de registry desplegado, verificaremos las imágenes de Dcoker que tenemos en nuestro sistema actualmente:
root@ub-registry-sbd:~# docker images
Crearemos un contenedor con un nginx ( ahora si que es un contenedor, ya que lo desplegaremos desde Dockerfile):
root@ub-registry-sbd:/etc/docker/nginx# cat Dockerfile
FROM docker.io/ubuntu
MAINTAINER OscarMas <[email protected]>
RUN apt-get update && apt-get install -y \
    nginx apt-utils
RUN echo "daemon off;" >> /etc/nginx/nginx.conf
ENTRYPOINT service nginx start
root@ub-registry-sbd:/etc/docker/nginx# docker build -t ub_nginx:0.0.1 .
Subiremos nuestra imagen al registry:
root@ub-registry-sbd:/etc/docker/nginx# docker tag ub_nginx:0.0.1 ub-registry-sbd.ilba.cat/ub_nginx:0.0.1
root@ub-registry-sbd:/etc/docker/nginx# docker push ub-registry-sbd.ilba.cat/ub_nginx:0.0.1
Ahora desde nuestro master de Kubernetes (ub-nodo0-sbd) crearemos el Secret, que no es nada más que el usuario y el password para poder acceder a nuestro Registry. Lo haremos de la siguiente manera:
rootdevel@ub-nodo0-sbd:~$ kubectl create secret docker-registry regsecret --docker-server=ub-registry-sbd.ilba.cat --docker-username=oscarmas --docker-password=xxx [email protected]
Una vez todo preparado, crearemos nuestro nuevo pod desde la imagen de nginx que tenemos en nuestro Registry y posteriormente verificaremos que se ha desplegado correctamente:
rootdevel@ub-nodo0-sbd:~$ cat private-registry-pod.yaml
apiVersion: v1
kind: Pod
metadata:
  name: private-reg
spec:
  containers:
    - name: private-registry-pod
      image: ub-registry-sbd.ilba.cat/ub_nginx:0.0.1
  imagePullSecrets:
    - name: regsecret
rootdevel@ub-nodo0-sbd:~$ kubectl create -f private-registry-pod.yaml
rootdevel@ub-nodo0-sbd:~$ kubectl get pods
No te pierdas la serie completa sobre Kubernetes de Oscar Mas:
- Kubernetes – Introducción a Kubernetes
- Kubernetes – Instalación
- Kubernetes – RollingUpdate con Kubernetes
- Kubernetes – Dashboard
- Kubernetes – Volúmenes NFS
- Kubernetes – Registry
- Kubernetes – Traefik
- Kubernetes – Systemd con Traefik y Proxy de Kubernetes
- Kubernetes – Heapster Influx Grafana
- Kubernetes – Labels de Kubernetes
- Kubernetes – API: Swagger
- Kubernetes – API: Creando nuestro primer POD
- Kubernetes – API: Seguridad con Token
es un post muy informativo y súper bien explicado. Muchas gracias.