
 Ya ha pasado casí un año de la entrada que preparé para la instalación de Zimbra 8.0.3 sobre Ubuntu 12.04, con un total de 11.439 personas a día de hoy que han disfrutado esta entrada y aprendido a desplegar Zimbra sobre Ubuntu 12.04 de manera rápida, en Singleserver.1
Hoy os traigo las instrucciones para desplegarlo sobre Redhat 6.5, y de esta manera poder tener nuestra plataforma Zimbra, sobre un entorno licenciado y con soporte de fabricante, como es Red Hat. Está especialmente orientado a empresas que necesiten tener soporte de fabricante detrás, por ese motivo también habría que contratar e instalar Zimbra Network Edition (en el tutorial vemos como se instala Opensource Edition).
Vamos allá con el menú
1.- Preparación del Servidor
2.- Instalación del Sistema Operativo
3.- Preparación del Sistema Operativo para Zimbra
3.1.- Suscripción con Red Hat
3.2.- Configuración de DNS
4.- Instalación de Zimbra ZCS OSE 8.0.6
4.1.- Firewall de Red Hat
5.- Visualizando el Panel de Control
6.- Visualizando la interfaz AJAX
7.- Agregar funcionalidades de Maletín y S/MIME
8.- Zimbra Acceso Móvil
9.- Jugando a ser Dioses, modo flujo de actividad
10.- Conclusiones
1.- Preparación del Servidor
Lo primero es crear nuestra VM para Red Hat, vamos a ver el paso a paso:
En nuestro VMWare Workstation pulsaremos File> New Virtual Machine. Seleccionaremos el modo de configuración Typical y pulsaremos “Next”. 
Buscaremos la ISO del DVD bajada desde Red Hat.
En el Guest Operating System, seleccionaremos Red Hat Enterprise Linux 6 64-bit.
El nombre que gustemos para nuestra VM, en mi caso Zimbra8-RHEL6
Con 20GB para el entorno de Laboratorio es más que suficiente, para vosotros, depende de vuestras necesidades y cuentas y tamaño de cada cuenta. Al ser virtual, se puede expandir en el futuro, además usaremos LVM que puede expandirse de manera muy simple. Yo siempre marco que me guarde el fichero como un único fichero.
Una vez terminamos todo, veremos el resumen, algo corto en memoria y vCPU, vamos a editarlo.
Después de las modificaciones quedará así, sin disquetera, con 4GB de RAM, 2 vCPU, y la red en modo Bridged.
2.- Instalación del Sistema Operativo
Al encender la VM, nos cargará desde el DVD de Red Hat y veremos el siguiente menú, pulsaremos Intro directamente, sin realizar ninguna de las opciones presentes.

Empezará a cargar todo lo necesario para la instalación.
Y veremos una instalación gráfica basada en Anaconda, que siempre es de agradecer para las personas menos duchas en Linux. Pulsaremos Next.
De idioma para la instalación seleccionaremos English y pusalremos Next.
Como teclado marcaremos Spanish y pulsaremos Next.
A la hora de seleccionar sobre que disco instalar Red Hat, tenemos Basic Storage (discos o unidades locales) o sobre Almacenamiento especializado, si tuvieramos un disco presentado por iSCSI, o Boot from SAN, Fibra, etc. Seleccionaremos la primera y pulsaremos Next
Nos mostrará nuestro disco de 20GB que hemos presentado a nuestra VM. Seleccionaremos Yes, discard any data, para borrar todo el disco y usarlo para la instalación.
Para el hostname usaremos el que queramos, recordemos que debe resolver vía DNS con una entrada de tipo A y preferiblemente una entrada MX también. Configuraremos la parte de Red desde aquí también, marcaremos Configure Network.
Seleccionaremos la red cableada (wired) y pulsaremos Edit.
En la pestaña IPv4 debe quedar de la siguiente manera, Manual > con la IP que queramos, de DNS uno público, o uno interno que nos resuelva el hostname anteriormente puesto y un dominio de búsqueda. Pulsaremos Apply.
Para la parte de la zona de tiempo, seleccionaremos en el Mapa, Madrid y pulsaremos Next
Introduciremos una contraseña para nuestro sistema y la confirmaremos y pulsaremos Next
Para la parte de disco, usaremos la opción Use All Space, esto creará un particionamiento recomendado, según RAM y espacio para crear la SWAP, etc, si queremos crear nuestro propio particionamiento, seleccionaremos Create Custom Layout. Pulsaremos Next
Marcamos que si queremos guardar los cambios en el disco.
Es la hora de seleccionar de que manera queremos preconfigurar el servidor, tenemos varias opciones, las cuales cada una trae unos paquetes u otros. Vamos a seleccionar Basic Server, posteriormente tendremos que eliminar postfix ya que lo adjunta esta configuración. Pulsaremos Next
Y el asistente comenzará a instalar los paquetes y dependencias necesarias para el correcto funcionamiento de nuestro Red Hat.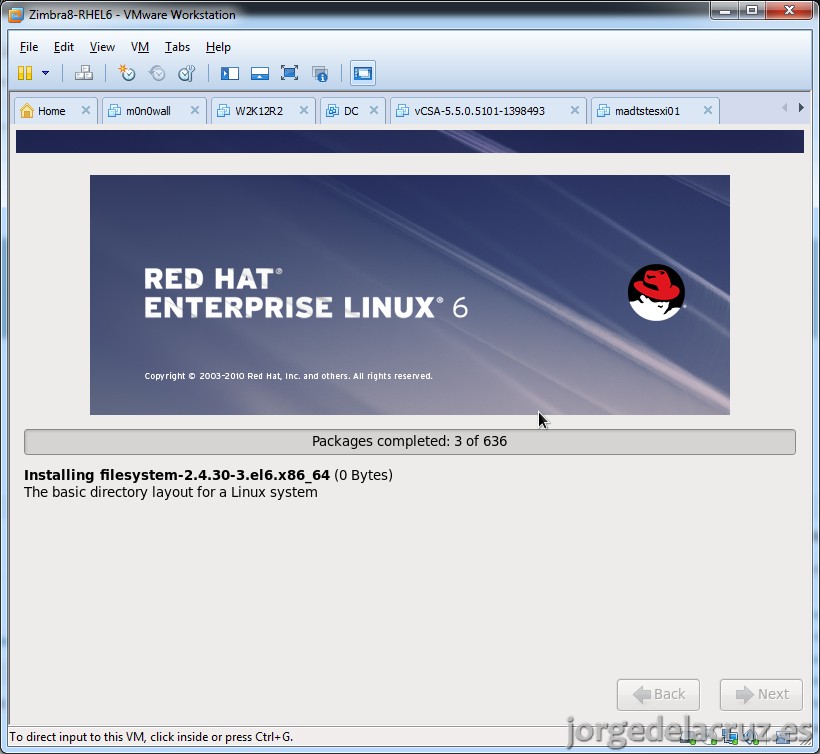

Una vez ha terminado, pulsaremos el botón de Reboot para continuar con nuestro tutorial.
3.- Preparación del Sistema Operativo para Zimbra
El primer paso es esperar que la VM arranque con nuestro Sistema Operativo Red Hat.

3.1.- Suscripción con Red Hat
El siguiente paso es Suscribir nuestra VM con la página de Suscripciones de Red Hat, tenemos una trial de 30 días sin compromiso.
Los comandos a lanzar son los siguientes:
[root@zimbra8-rhel6]# subscription-manager register
Y nos solicitará nuestro Usuario y Contraseña del portal de Red Hat.
En la captura estoy rehaciendo el proceso de suscripción y he tenido que introducir lo siguiente:
[root@zimbra8-rhel6]# subscription-manager register –force

Como vemos más arriba, el sistema nos devuelve un UUID, que es único.
Ahora nos iremos hasta nuestro portal de suscripción donde podremos ver un resumen de las licencias que tenemos válidas y compradas para usar, tanto para sistemas físicos como para Virtuales o Hypervisores. Os dejo la lista de precios aquí.
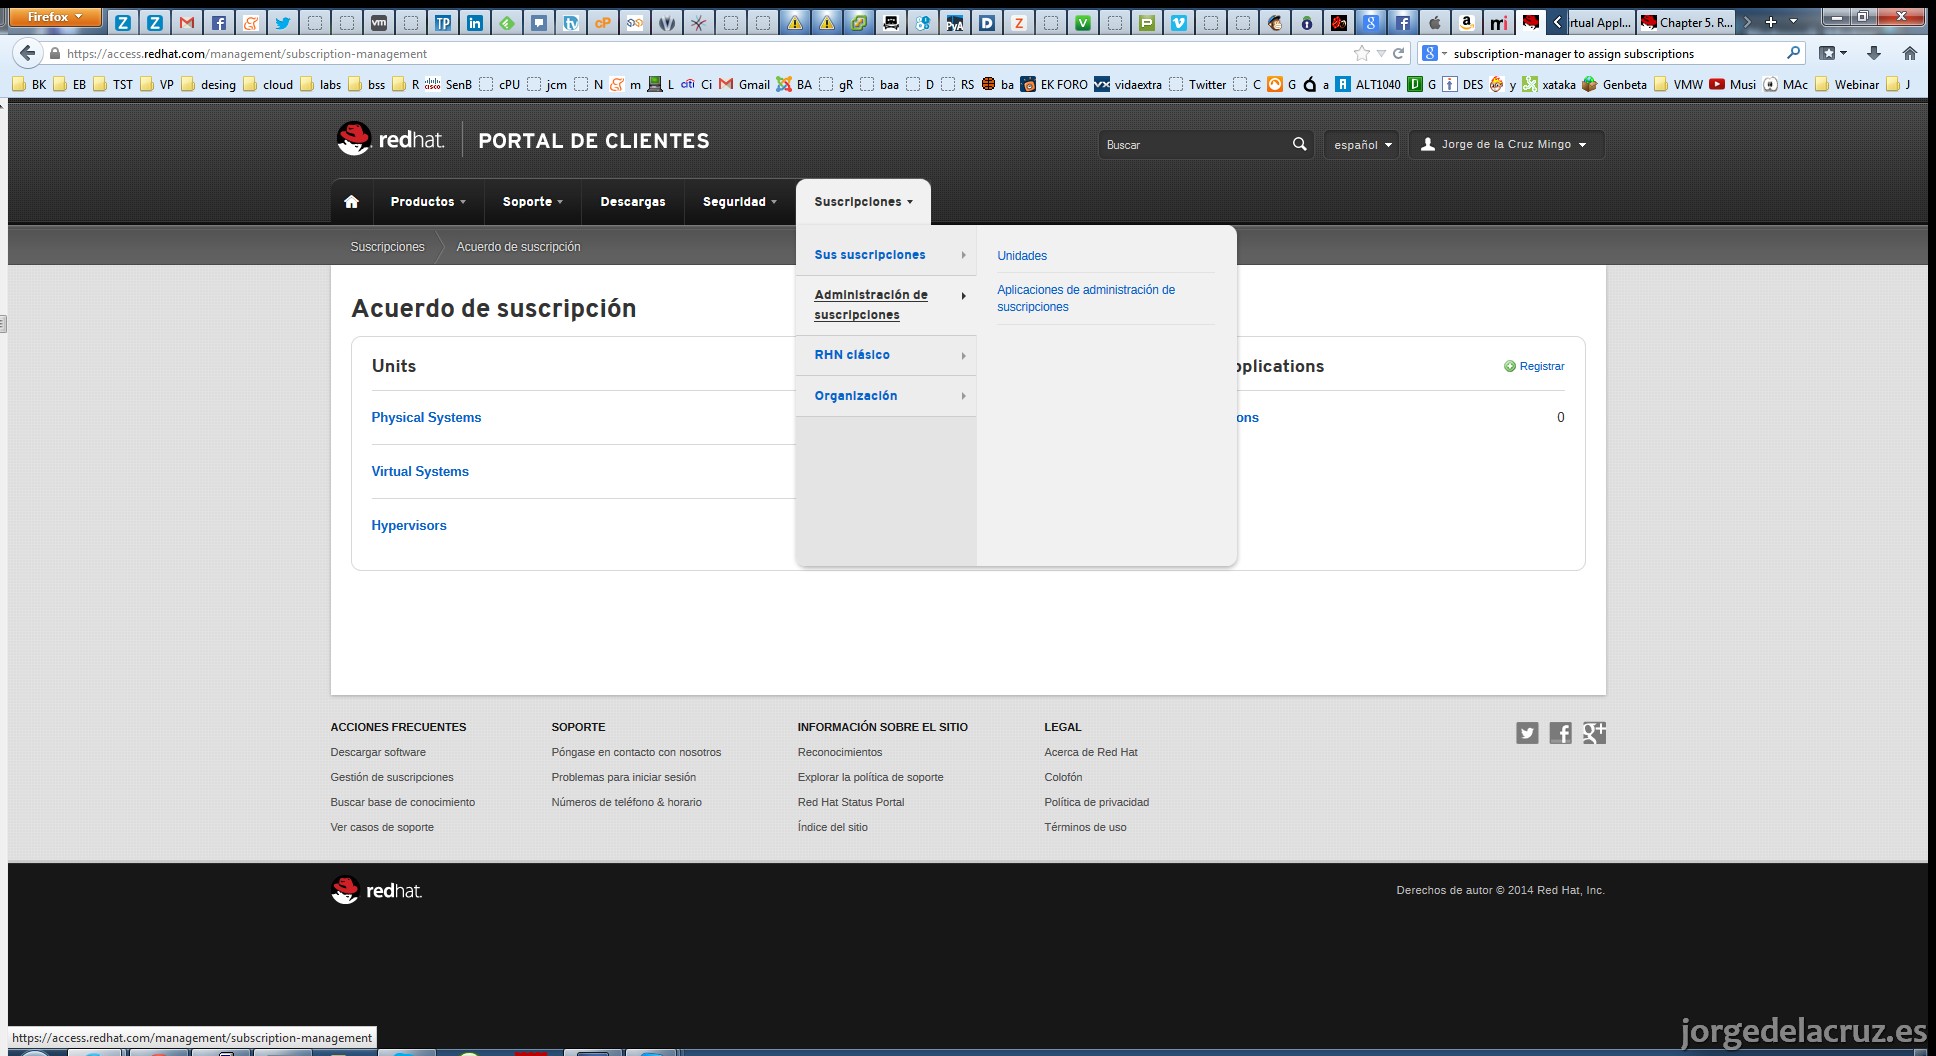
Si pulsamos en Administración de suscripciones en la ventana anterior, podremos ver un listado con nuestros Red Hat y nos dirá si están correctamente suscritos o no. En nuestro caso vemos en la imagen un mensaje en rojo donde nos indica que no está suscrito.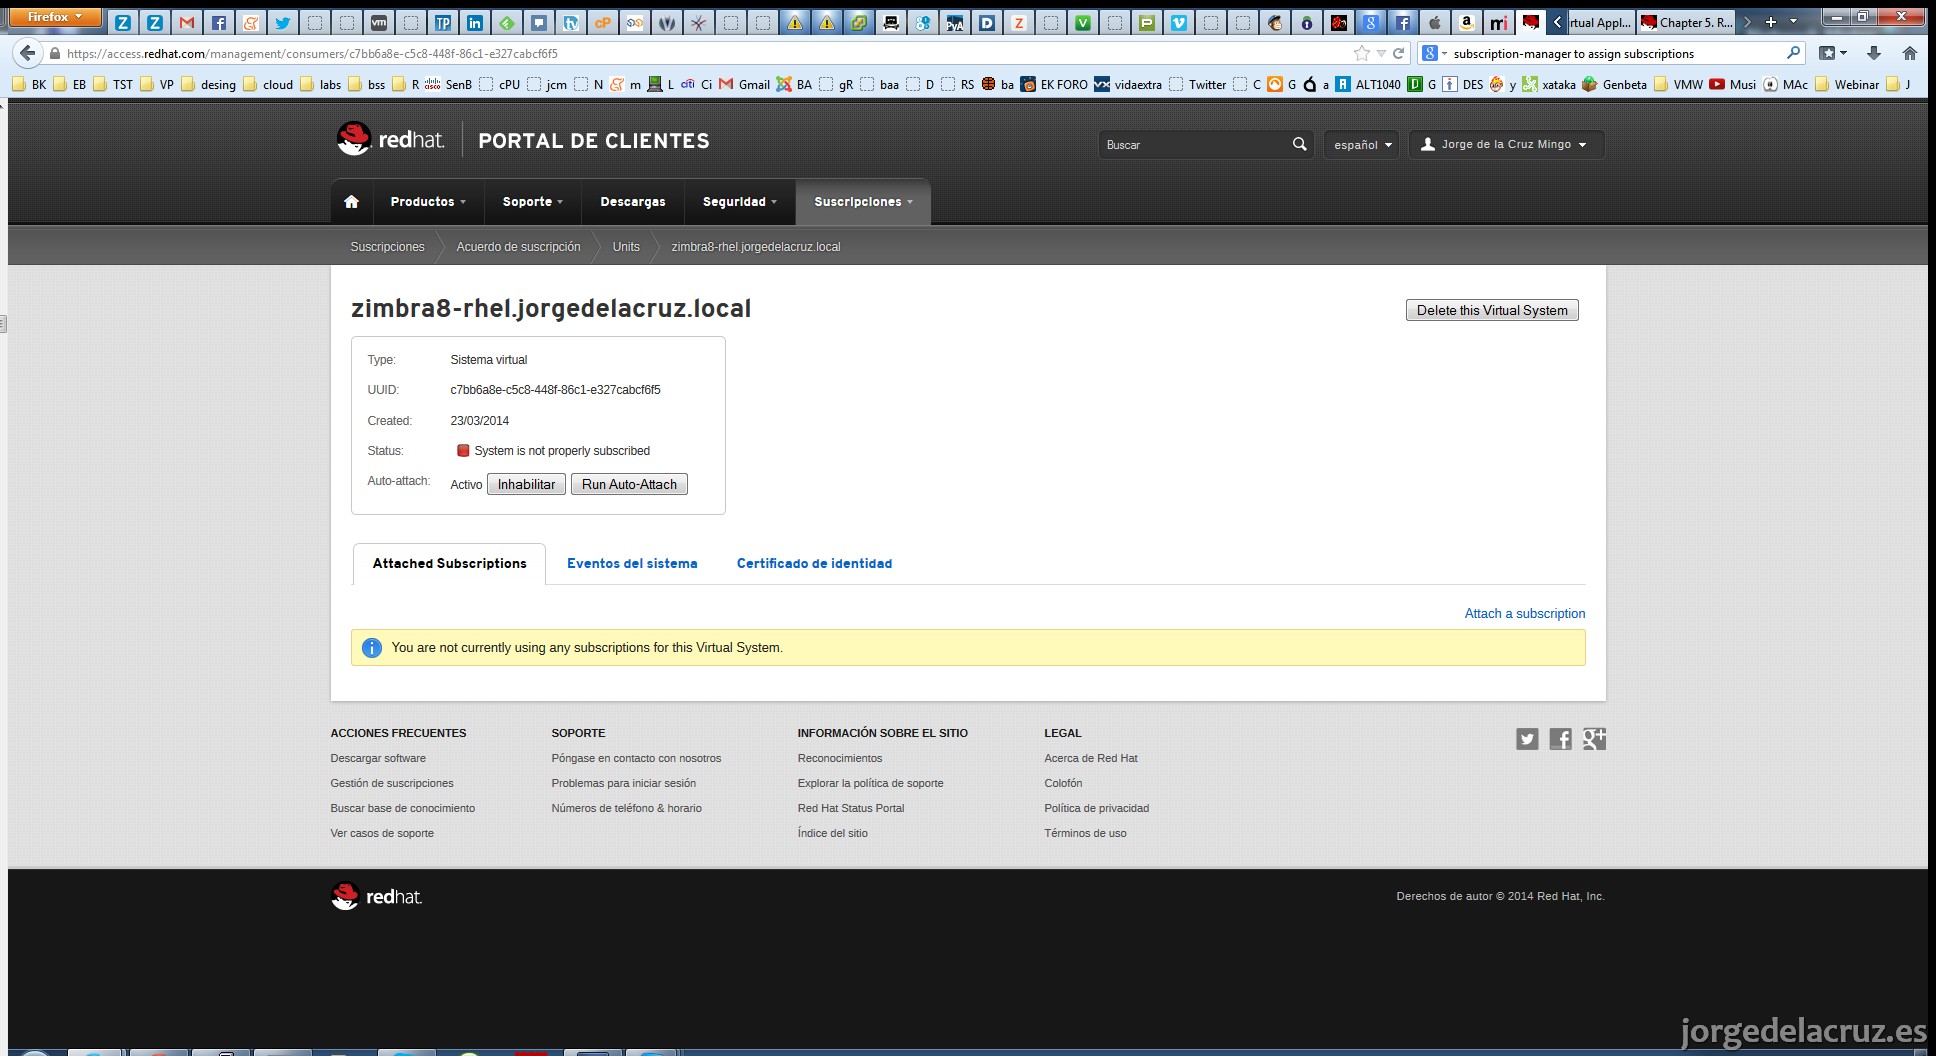
Podemos pulsar en Attach a subscription, esquina inferior derecha, y seleccionar la de 30 días para entorno virtual que tenemos disponible. O nuestra licencia que hayamos comprado a Red Hat.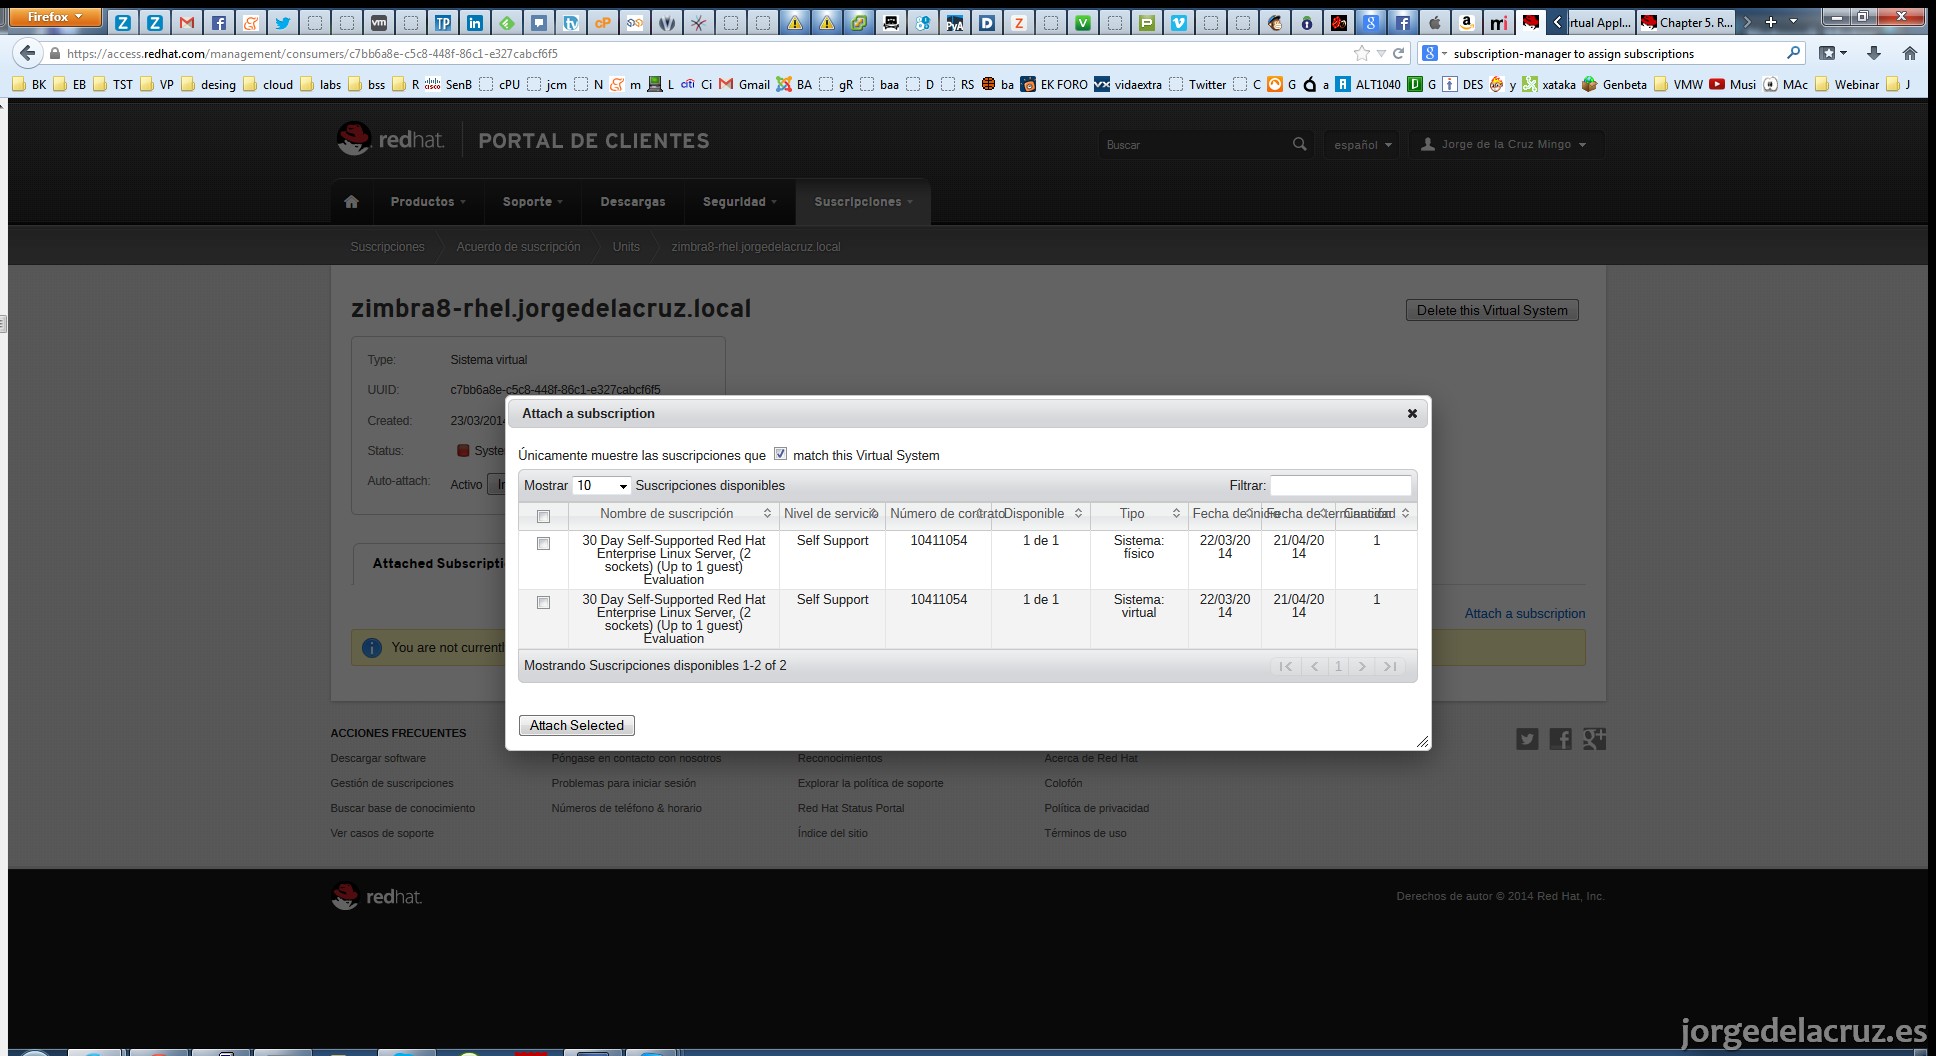
Marcamos la virtual de 30 días de prueba y pulsamos en Attach Selected.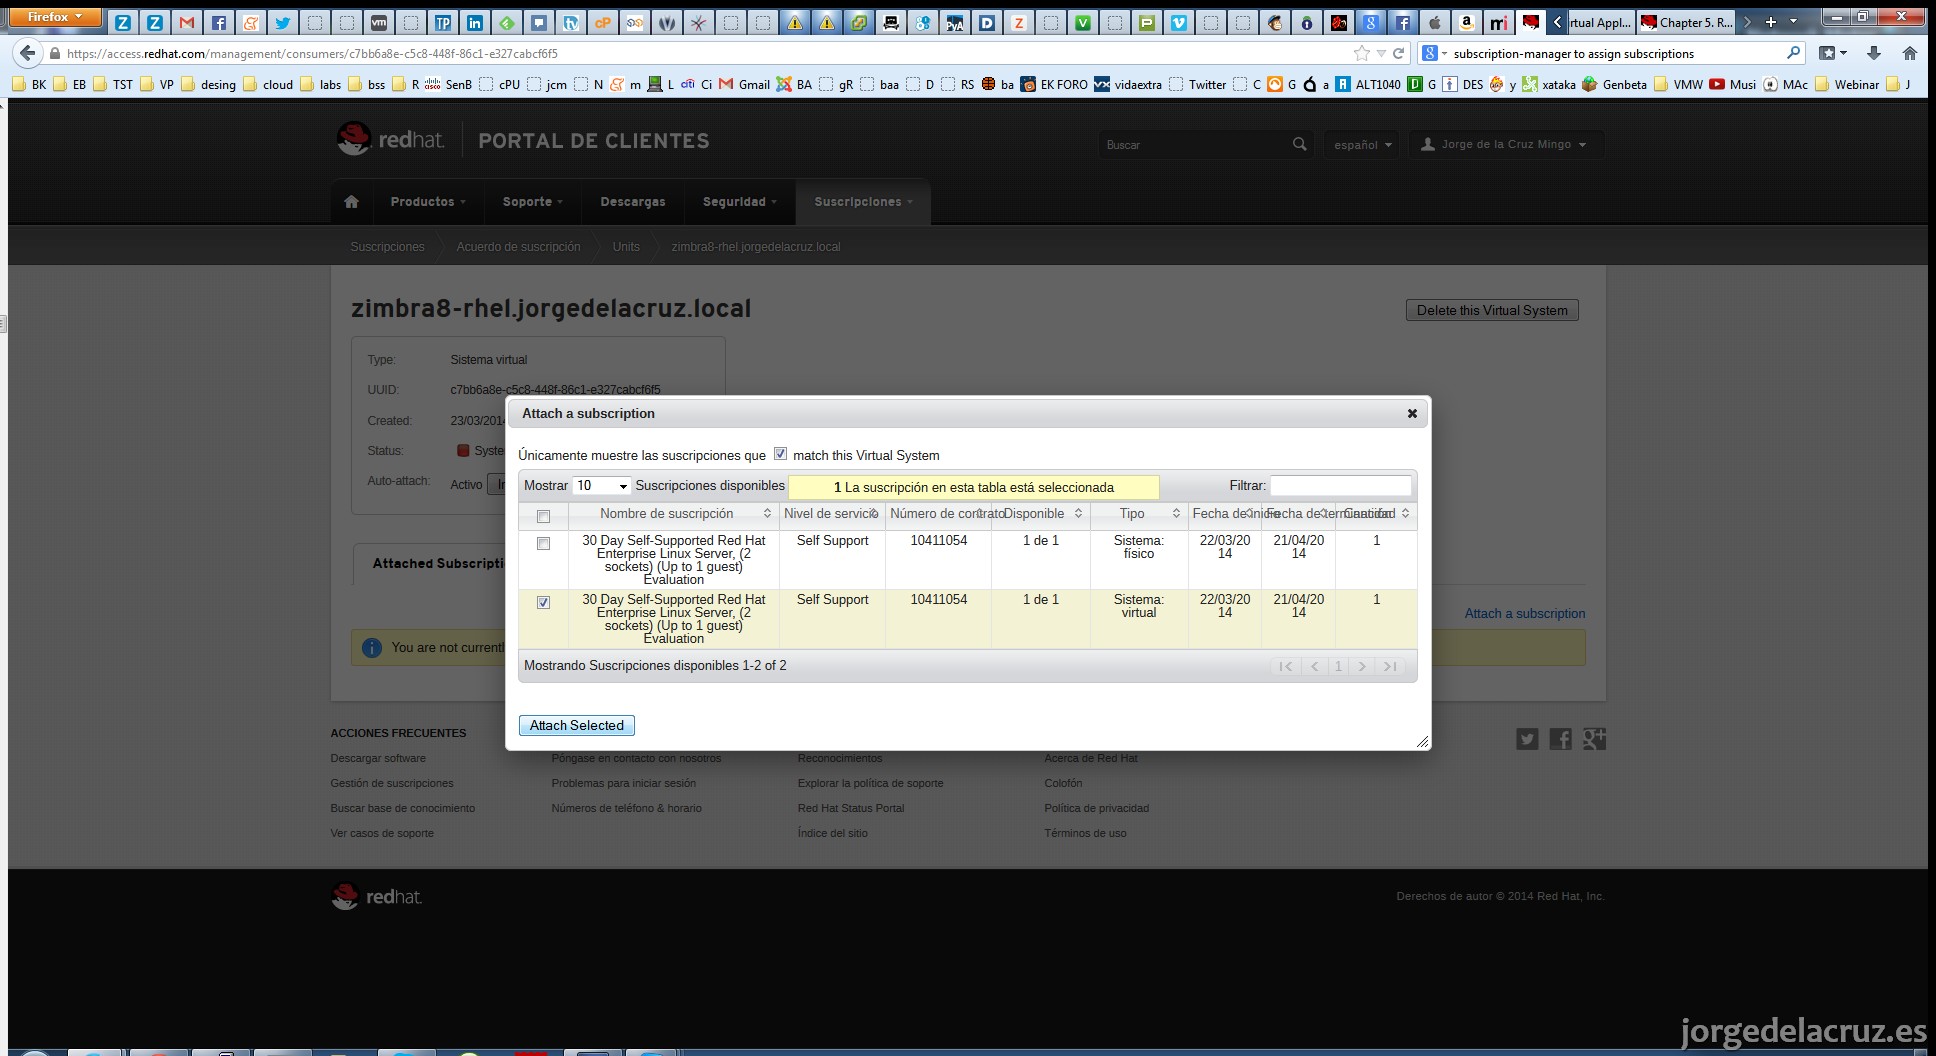
Y ya podremos ver que nuestro sistema y su UUID está suscrito y estamos consumiendo una suscripción.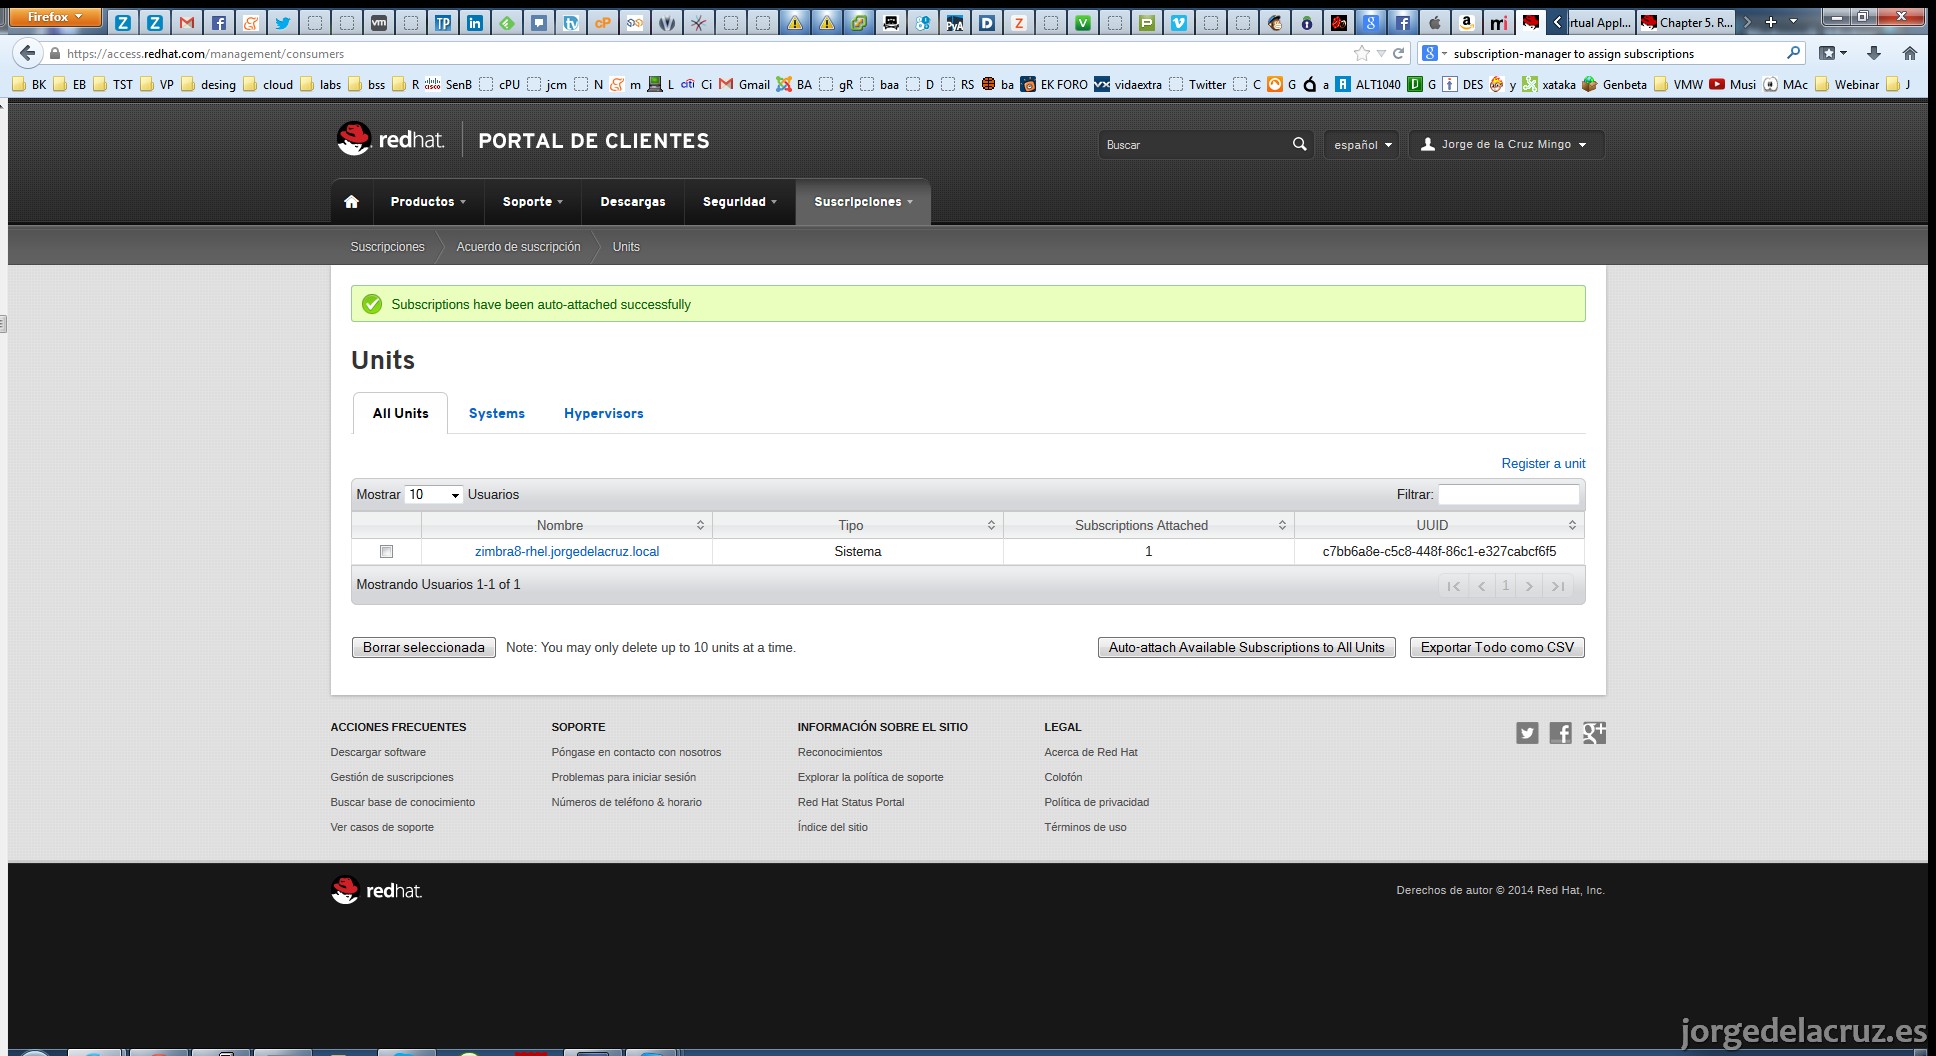
Ya podremos volver al Sistema Operativo y realizar un yum update para actualizar dependencias. 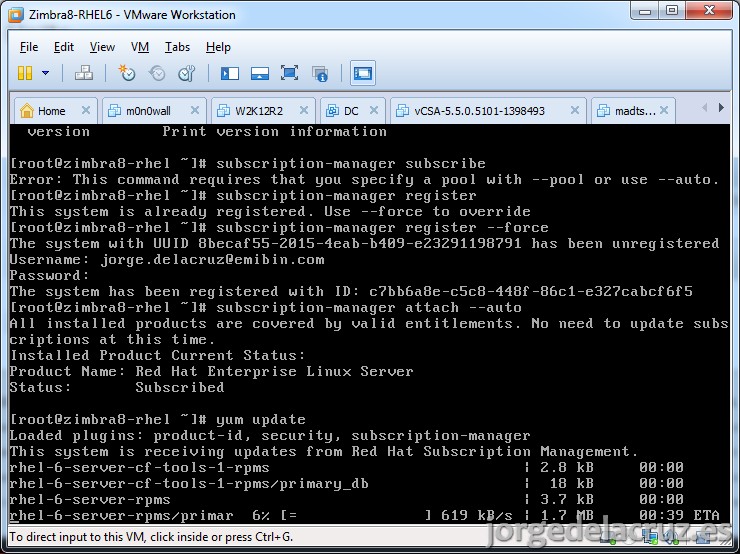

Desinstalando Postfix: Tendremos que desinstalar Postfix antes de continuar con la instalación:
[root@zimbra8-rhel6]# rpm -qa | grep postfix
 postfix-2.6.6-6.el6_5.x86_64
 [root@zimbra8-rhel6]#
 [root@zimbra8-rhel6]#
 [root@zimbra8-rhel6]# /etc/rc.d/init.d/postfix stop
 Shutting down postfix: [ OK ]
 [root@zimbra8-rhel6]# rpm -e --nodeps postfix-2.6.6-6.el6_5.x86_64
 [root@zimbra8-rhel6]#
E instalar el paquete nc, ya que el resto de dependicas al seleccionar Basic Server, ya vienen incluidas:
yum install nc
3.2.- Configuración de DNS
De manera externa: Lo normal en un entorno donde queremos instalar un Red Hat licenciado y un Zimbra Network Edition, es que usemos un servidor DNS corporativo, ya sea de Microsoft o un BIND/Named, etc. En otro servidor, como en la siguiente imagen:

4.- Instalación de Zimbra ZCS Open Source Edition 8.0.6
Ha llegado la hora de instalar el software de Zimbra, vamos a descargar la última versión de Zimbra, 8.0.6:
[root@zimbra8-rhel6]# wget http://files2.zimbra.com/downloads/8.0.6_GA/zcs-8.0.6_GA_5922.RHEL6_64.20131203103705.tgz
Procedemos a descomprimir zimbra:
root@zimbra8:~# tar -xzvf zcs-8.0.6_GA_5922.RHEL6_64.20131203103705.tgz
Y procederemos a instalar Zimbra:
[root@zimbra8-rhel6 zcs-8.0.6_GA_5922.RHEL6_64.20131203103705]# ./install.sh

Operations logged to /tmp/install.log.1787
Checking for existing installation...
zimbra-ldap...NOT FOUND
zimbra-logger...NOT FOUND
zimbra-mta...NOT FOUND
zimbra-snmp...NOT FOUND
zimbra-store...NOT FOUND
zimbra-apache...NOT FOUND
zimbra-spell...NOT FOUND
zimbra-convertd...NOT FOUND
zimbra-memcached...NOT FOUND
zimbra-proxy...NOT FOUND
zimbra-archiving...NOT FOUND
zimbra-cluster...NOT FOUND
zimbra-core...NOT FOUND

PLEASE READ THIS AGREEMENT CAREFULLY BEFORE USING THE SOFTWARE.
ZIMBRA, INC. ("ZIMBRA") WILL ONLY LICENSE THIS SOFTWARE TO YOU IF YOU
FIRST ACCEPT THE TERMS OF THIS AGREEMENT. BY DOWNLOADING OR INSTALLING
THE SOFTWARE, OR USING THE PRODUCT, YOU ARE CONSENTING TO BE BOUND BY
THIS AGREEMENT. IF YOU DO NOT AGREE TO ALL OF THE TERMS OF THIS
AGREEMENT, THEN DO NOT DOWNLOAD, INSTALL OR USE THE PRODUCT.

License Terms for the Zimbra Collaboration Suite:
http://www.zimbra.com/license/zimbra_public_eula_2.4.html
Do you agree with the terms of the software license agreement? [N] y
Una vez hemos aceptado los Términos de Licencia, continuamos con más textos legales:
Oracle Binary Code License Agreement for the Java SE Platform Products

ORACLE AMERICA, INC. ("ORACLE"), FOR AND ON BEHALF OF ITSELF AND ITS SUBSIDIARIES AND AFFILIATES UNDER COMMON CONTROL, IS WILLING TO LICENSE THE SOFTWARE TO YOU ONLY UPON THE CONDITION THAT YOU ACCEPT ALL OF THE TERMS CONTAINED IN THIS BINARY CODE LICENSE AGREEMENT AND SUPPLEMENTAL LICENSE TERMS (COLLECTIVELY "AGREEMENT"). PLEASE READ THE AGREEMENT CAREFULLY. BY SELECTING THE "ACCEPT LICENSE AGREEMENT" (OR THE EQUIVALENT) BUTTON AND/OR BY USING THE SOFTWARE YOU ACKNOWLEDGE THAT YOU HAVE READ THE TERMS AND AGREE TO THEM. IF YOU ARE AGREEING TO THESE TERMS ON BEHALF OF A COMPANY OR OTHER LEGAL ENTITY, YOU REPRESENT THAT YOU HAVE THE LEGAL AUTHORITY TO BIND THE LEGAL ENTITY TO THESE TERMS. IF YOU DO NOT HAVE SUCH AUTHORITY, OR IF YOU DO NOT WISH TO BE BOUND BY THE TERMS, THEN SELECT THE "DECLINE LICENSE AGREEMENT" (OR THE EQUIVALENT) BUTTON AND YOU MUST NOT USE THE SOFTWARE ON THIS SITE OR ANY OTHER MEDIA ON WHICH THE SOFTWARE IS CONTAINED.

1. DEFINITIONS. "Software" means the Java SE Platform Products in binary form that you selected for download, install or use from Oracle or its authorized licensees, any other machine readable materials (including, but not limited to, libraries, source files, header files, and data files), any updates or error corrections provided by Oracle, and any user manuals, programming guides and other documentation provided to you by Oracle under this Agreement. "General Purpose Desktop Computers and Servers" means computers, including desktop and laptop computers, or servers, used for general computing functions under end user control (such as but not specifically limited to email, general purpose Internet browsing, and office suite productivity tools). The use of Software in systems and solutions that provide dedicated functionality (other than as mentioned above) or designed for use in embedded or function-specific software applications, for example but not limited to: Software embedded in or bundled with industrial control systems, wireless mobile telephones, wireless handheld devices, netbooks, kiosks, TV/STB, Blu-ray Disc devices, telematics and network control switching equipment, printers and storage management systems, and other related systems are excluded from this definition and not licensed under this Agreement. "Programs" means Java technology applets and applications intended to run on the Java Platform, Standard Edition platform on Java-enabled General Purpose Desktop Computers and Servers. ?Commercial Features? means those features identified in Table 1-1 (Commercial Features In Java SE Product Editions) of the Software documentation accessible at http://www.oracle.com/technetwork/java/javase/documentation/index.html. ?README File? means the README file for the Software accessible at http://www.oracle.com/technetwork/java/javase/terms/readme/index.html.

2. LICENSE TO USE. Subject to the terms and conditions of this Agreement including, but not limited to, the Java Technology Restrictions of the Supplemental License Terms, Oracle grants you a non-exclusive, non-transferable, limited license without license fees to reproduce and use internally the Software complete and unmodified for the sole purpose of running Programs. THE LICENSE SET FORTH IN THIS SECTION 2 DOES NOT EXTEND TO THE COMMERCIAL FEATURES. YOUR RIGHTS AND OBLIGATIONS RELATED TO THE COMMERCIAL FEATURES ARE AS SET FORTH IN THE SUPPLEMENTAL TERMS ALONG WITH ADDITIONAL LICENSES FOR DEVELOPERS AND PUBLISHERS.

3. RESTRICTIONS. Software is copyrighted. Title to Software and all associated intellectual property rights is retained by Oracle and/or its licensors. Unless enforcement is prohibited by applicable law, you may not modify, decompile, or reverse engineer Software. You acknowledge that the Software is developed for general use in a variety of information management applications; it is not developed or intended for use in any inherently dangerous applications, including applications that may create a risk of personal injury. If you use the Software in dangerous applications, then you shall be responsible to take all appropriate fail-safe, backup, redundancy, and other measures to ensure its safe use. Oracle disclaims any express or implied warranty of fitness for such uses. No right, title or interest in or to any trademark, service mark, logo or trade name of Oracle or its licensors is granted under this Agreement. Additional restrictions for developers and/or publishers licenses are set forth in the Supplemental License Terms.

4. DISCLAIMER OF WARRANTY. THE SOFTWARE IS PROVIDED "AS IS" WITHOUT WARRANTY OF ANY KIND. ORACLE FURTHER DISCLAIMS ALL WARRANTIES, EXPRESS AND IMPLIED, INCLUDING WITHOUT LIMITATION, ANY IMPLIED WARRANTIES OF MERCHANTABILITY, FITNESS FOR A PARTICULAR PURPOSE OR NONINFRINGEMENT.

5. LIMITATION OF LIABILITY. IN NO EVENT SHALL ORACLE BE LIABLE FOR ANY INDIRECT, INCIDENTAL, SPECIAL, PUNITIVE OR CONSEQUENTIAL DAMAGES, OR DAMAGES FOR LOSS OF PROFITS, REVENUE, DATA OR DATA USE, INCURRED BY YOU OR ANY THIRD PARTY, WHETHER IN AN ACTION IN CONTRACT OR TORT, EVEN IF ORACLE HAS BEEN ADVISED OF THE POSSIBILITY OF SUCH DAMAGES. ORACLE'S ENTIRE LIABILITY FOR DAMAGES HEREUNDER SHALL IN NO EVENT EXCEED ONE THOUSAND DOLLARS (U.S. $1,000).

6. TERMINATION. This Agreement is effective until terminated. You may terminate this Agreement at any time by destroying all copies of Software. This Agreement will terminate immediately without notice from Oracle if you fail to comply with any provision of this Agreement. Either party may terminate this Agreement immediately should any Software become, or in either party's opinion be likely to become, the subject of a claim of infringement of any intellectual property right. Upon termination, you must destroy all copies of Software.

7. EXPORT REGULATIONS. You agree that U.S. export control laws and other applicable export and import laws govern your use of the Software, including technical data; additional information can be found on Oracle's Global Trade Compliance web site (http://www.oracle.com/products/export). You agree that neither the Software nor any direct product thereof will be exported, directly, or indirectly, in violation of these laws, or will be used for any purpose prohibited by these laws including, without limitation, nuclear, chemical, or biological weapons proliferation.

8. TRADEMARKS AND LOGOS. You acknowledge and agree as between you and Oracle that Oracle owns the ORACLE and JAVA trademarks and all ORACLE- and JAVA-related trademarks, service marks, logos and other brand designations ("Oracle Marks"), and you agree to comply with the Third Party Usage Guidelines for Oracle Trademarks currently located at
http://www.oracle.com/us/legal/third-party-trademarks/index.html. Any use you make of the Oracle Marks inures to Oracle's benefit.

9. U.S. GOVERNMENT LICENSE RIGHTS. If Software is being acquired by or on behalf of the U.S. Government or by a U.S. Government prime contractor or subcontractor (at any tier), then the Government's rights in Software and accompanying documentation shall be only those set forth in this Agreement.

10. GOVERNING LAW. This agreement is governed by the substantive and procedural laws of California. You and Oracle agree to submit to the exclusive jurisdiction of, and venue in, the courts of San Francisco, or Santa Clara counties in California in any dispute arising out of or relating to this agreement.

11. SEVERABILITY. If any provision of this Agreement is held to be unenforceable, this Agreement will remain in effect with the provision omitted, unless omission would frustrate the intent of the parties, in which case this Agreement will immediately terminate.

12. INTEGRATION. This Agreement is the entire agreement between you and Oracle relating to its subject matter. It supersedes all prior or contemporaneous oral or written communications, proposals, representations and warranties and prevails over any conflicting or additional terms of any quote, order, acknowledgment, or other communication between the parties relating to its subject matter during the term of this Agreement. No modification of this Agreement will be binding, unless in writing and signed by an authorized representative of each party.

SUPPLEMENTAL LICENSE TERMS

These Supplemental License Terms add to or modify the terms of the Binary Code License Agreement. Capitalized terms not defined in these Supplemental Terms shall have the same meanings ascribed to them in the Binary Code License Agreement. These Supplemental Terms shall supersede any inconsistent or conflicting terms in the Binary Code License Agreement, or in any license contained within the Software.

A. COMMERCIAL FEATURES. You may not use the Commercial Features for running Programs, Java applets or applications in your internal business operations or for any commercial or production purpose, or for any purpose other than as set forth in Sections B, C, D and E of these Supplemental Terms. If You want to use the Commercial Features for any purpose other than as permitted in this Agreement, You must obtain a separate license from Oracle.

B. SOFTWARE INTERNAL USE FOR DEVELOPMENT LICENSE GRANT. Subject to the terms and conditions of this Agreement and restrictions and exceptions set forth in the README File incorporated herein by reference, including, but not limited to the Java Technology Restrictions of these Supplemental Terms, Oracle grants you a non-exclusive, non-transferable, limited license without fees to reproduce internally and use internally the Software complete and unmodified for the purpose of designing, developing, and testing your Programs.

C. LICENSE TO DISTRIBUTE SOFTWARE. Subject to the terms and conditions of this Agreement and restrictions and exceptions set forth in the README File, including, but not limited to the Java Technology Restrictions of these Supplemental Terms, Oracle grants you a non-exclusive, non-transferable, limited license without fees to reproduce and distribute the Software, provided that (i) you distribute the Software complete and unmodified and only bundled as part of, and for the sole purpose of running, your Programs, (ii) the Programs add significant and primary functionality to the Software, (iii) you do not distribute additional software intended to replace any component(s) of the Software, (iv) you do not remove or alter any proprietary legends or notices contained in the Software, (v) you only distribute the Software subject to a license agreement that: (a) is a complete, unmodified reproduction of this Agreement; or (b) protects Oracle's interests consistent with the terms contained in this Agreement and that includes the notice set forth in Section G, and (vi) you agree to defend and indemnify Oracle and its licensors from and against any damages, costs, liabilities, settlement amounts and/or expenses (including attorneys' fees) incurred in connection with any claim, lawsuit or action by any third party that arises or results from the use or distribution of any and all Programs and/or Software.

D. LICENSE TO DISTRIBUTE REDISTRIBUTABLES. Subject to the terms and conditions of this Agreement and restrictions and exceptions set forth in the README File, including but not limited to the Java Technology Restrictions of these Supplemental Terms, Oracle grants you a non-exclusive, non-transferable, limited license without fees to reproduce and distribute those files specifically identified as redistributable in the README File ("Redistributables") provided that: (i) you distribute the Redistributables complete and unmodified, and only bundled as part of Programs, (ii) the Programs add significant and primary functionality to the Redistributables, (iii) you do not distribute additional software intended to supersede any component(s) of the Redistributables (unless otherwise specified in the applicable README File), (iv) you do not remove or alter any proprietary legends or notices contained in or on the Redistributables, (v) you only distribute the Redistributables pursuant to a license agreement that: (a) is a complete, unmodified reproduction of this Agreement; or (b) protects Oracle's interests consistent with the terms contained in the Agreement and includes the notice set forth in Section G, (vi) you agree to defend and indemnify Oracle and its licensors from and against any damages, costs, liabilities, settlement amounts and/or expenses (including attorneys' fees) incurred in connection with any claim, lawsuit or action by any third party that arises or results from the use or distribution of any and all Programs and/or Software.

E. DISTRIBUTION BY PUBLISHERS. This section pertains to your distribution of the JavaTM SE Development Kit Software with your printed book or magazine (as those terms are commonly used in the industry) relating to Java technology ("Publication"). Subject to and conditioned upon your compliance with the restrictions and obligations contained in the Agreement, Oracle hereby grants to you a non-exclusive, nontransferable limited right to reproduce complete and unmodified copies of the Software on electronic media (the "Media") for the sole purpose of inclusion and distribution with your Publication(s), subject to the following terms: (i) You may not distribute the Software on a stand-alone basis; it must be distributed with your Publication(s); (ii) You are responsible for downloading the Software from the applicable Oracle web site; (iii) You must refer to the Software as JavaTM SE Development Kit; (iv) The Software must be reproduced in its entirety and without any modification whatsoever (including with respect to all proprietary notices) and distributed with your Publication subject to a license agreement that is a complete, unmodified reproduction of this Agreement; (v) The Media label shall include the following information: Copyright 2011, Oracle America, Inc. All rights reserved. Use is subject to license terms. ORACLE and JAVA trademarks and all ORACLE- and JAVA-related trademarks, service marks, logos and other brand designations are trademarks or registered trademarks of Oracle in the U.S. and other countries. This information must be placed on the Media label in such a manner as to only apply to the Oracle Software; (vi) You must clearly identify the Software as Oracle's product on the Media holder or Media label, and you may not state or imply that Oracle is responsible for any third-party software contained on the Media; (vii) You may not include any third party software on the Media which is intended to be a replacement or substitute for the Software; (viii) You agree to defend and indemnify Oracle and its licensors from and against any damages, costs, liabilities, settlement amounts and/or expenses (including attorneys' fees) incurred in connection with any claim, lawsuit or action by any third party that arises or results from the use or distribution of the Software and/or the Publication; ; and (ix) You shall provide Oracle with a written notice for each Publication; such notice shall include the following information: (1) title of Publication, (2) author(s), (3) date of Publication, and (4) ISBN or ISSN numbers. Such notice shall be sent to Oracle America, Inc., 500 Oracle Parkway, Redwood Shores, California 94065 U.S.A , Attention: General Counsel.

F. JAVA TECHNOLOGY RESTRICTIONS. You may not create, modify, or change the behavior of, or authorize your licensees to create, modify, or change the behavior of, classes, interfaces, or subpackages that are in any way identified as "java", "javax", "sun", ?oracle? or similar convention as specified by Oracle in any naming convention designation.

G. COMMERCIAL FEATURES NOTICE. For purpose of complying with Supplemental Term Section C.(v)(b) and D.(v)(b), your license agreement shall include the following notice, where the notice is displayed in a manner that anyone using the Software will see the notice:

Use of the Commercial Features for any commercial or production purpose requires a separate license from Oracle. ?Commercial Features? means those features identified Table 1-1 (Commercial Features In Java SE Product Editions) of the Software documentation accessible at http://www.oracle.com/technetwork/java/javase/documentation/index.html

H. SOURCE CODE. Software may contain source code that, unless expressly licensed for other purposes, is provided solely for reference purposes pursuant to the terms of this Agreement. Source code may not be redistributed unless expressly provided for in this Agreement.

I. THIRD PARTY CODE. Additional copyright notices and license terms applicable to portions of the Software are set forth in the THIRDPARTYLICENSEREADME file accessible at http://www.oracle.com/technetwork/java/javase/documentation/index.html. In addition to any terms and conditions of any third party opensource/freeware license identified in the THIRDPARTYLICENSEREADME file, the disclaimer of warranty and limitation of liability provisions in paragraphs 4 and 5 of the Binary Code License Agreement shall apply to all Software in this distribution.

J. TERMINATION FOR INFRINGEMENT. Either party may terminate this Agreement immediately should any Software become, or in either party's opinion be likely to become, the subject of a claim of infringement of any intellectual property right.
K. INSTALLATION AND AUTO-UPDATE. The Software's installation and auto-update processes transmit a limited amount of data to Oracle (or its service provider) about those specific processes to help Oracle understand and optimize them. Oracle does not associate the data with personally identifiable information. You can find more information about the data Oracle collects as a result of your Software download at http://www.oracle.com/technetwork/java/javase/documentation/index.html.
For inquiries please contact: Oracle America, Inc., 500 Oracle Parkway,
Redwood Shores, California 94065, USA.
Last updated May 17, 2011

Do you agree with the terms of the software license agreement? [N] y
Lo siguiente que hará el sistema es comprobar si hemos olvidado alguna libreria o dependencia:
Checking for prerequisites...
FOUND: NPTL
FOUND: nc-1.84-22
FOUND: sudo-1.8.6p3-12
FOUND: libidn-1.18-2
FOUND: gmp-4.3.1-7
FOUND: /usr/lib64/libstdc++.so.6

Checking for suggested prerequisites...
FOUND: perl-5.10.1
FOUND: sysstat
FOUND: sqlite

Prerequisite check complete.

Checking for installable packages

Found zimbra-core
Found zimbra-ldap
Found zimbra-logger
Found zimbra-mta
Found zimbra-snmp
Found zimbra-store
Found zimbra-apache
Found zimbra-spell
Found zimbra-memcached
Found zimbra-proxy
Después tendremos que indicar que Roles queremos asignar a este servidor, al tratarse de una instalación Singleserver, seleccionaremos las siguientes:
Select the packages to install

Install zimbra-ldap [Y]

Install zimbra-logger [Y]

Install zimbra-mta [Y]

Install zimbra-snmp [Y]

Install zimbra-store [Y]

Install zimbra-apache [Y]

Install zimbra-spell [Y]

Install zimbra-memcached [N]

Install zimbra-proxy [N]

Checking required space for zimbra-core
Checking space for zimbra-store

Installing:
zimbra-core
zimbra-ldap
zimbra-logger
zimbra-mta
zimbra-snmp
zimbra-store
zimbra-apache
zimbra-spell
Pulsaremos y para continuar con la instalación
The system will be modified. Continue? [N] y

Removing /opt/zimbra
Removing zimbra crontab entry...done.
Cleaning up zimbra init scripts...done.
Cleaning up /etc/ld.so.conf...done.
Cleaning up /etc/prelink.conf...done.
Cleaning up /etc/security/limits.conf...done.

Finished removing Zimbra Collaboration Server.

Installing packages

zimbra-core......zimbra-core-8.0.6_GA_5922.RHEL6_64-20131203103705.x86_64.rpm...done
zimbra-ldap......zimbra-ldap-8.0.6_GA_5922.RHEL6_64-20131203103705.x86_64.rpm...done
zimbra-logger......zimbra-logger-8.0.6_GA_5922.RHEL6_64-20131203103705.x86_64.rpm...done
zimbra-mta......zimbra-mta-8.0.6_GA_5922.RHEL6_64-20131203103705.x86_64.rpm...done
zimbra-snmp......zimbra-snmp-8.0.6_GA_5922.RHEL6_64-20131203103705.x86_64.rpm...done
zimbra-store......zimbra-store-8.0.6_GA_5922.RHEL6_64-20131203103705.x86_64.rpm...done
zimbra-apache......zimbra-apache-8.0.6_GA_5922.RHEL6_64-20131203103705.x86_64.rpm...done
zimbra-spell......zimbra-spell-8.0.6_GA_5922.RHEL6_64-20131203103705.x86_64.rpm...done

Operations logged to /tmp/zmsetup.03232014-044656.log
Installing LDAP configuration database...done.
Setting defaults...

DNS ERROR resolving MX for zimbra8-rhel6.jorgedelacruz.es
It is suggested that the domain name have an MX record configured in DNS
Change domain name? [Yes] no
done.
Checking for port conflicts
El siguiente menú, es el menú general de Instalación de Zimbra, vamos a entrar al menú número 3 para editar los campos con ****:
Main menu

1) Common Configuration:
2) zimbra-ldap: Enabled
3) zimbra-store: Enabled
+Create Admin User: yes
+Admin user to create: [email protected]
******* +Admin Password UNSET
+Anti-virus quarantine user: [email protected]
+Enable automated spam training: yes
+Spam training user: [email protected]
+Non-spam(Ham) training user: [email protected]
+SMTP host: zimbra8-rhel6.jorgedelacruz.es
+Web server HTTP port: 80
+Web server HTTPS port: 443
+Web server mode: https
+IMAP server port: 143
+IMAP server SSL port: 993
+POP server port: 110
+POP server SSL port: 995
+Use spell check server: yes
+Spell server URL: http://zimbra8-rhel6.jorgedelacruz.es:7780/aspell.php
+Configure for use with mail proxy: FALSE
+Configure for use with web proxy: FALSE
+Enable version update checks: TRUE
+Enable version update notifications: TRUE
+Version update notification email: [email protected]
+Version update source email: [email protected]

4) zimbra-mta: Enabled
5) zimbra-snmp: Enabled
6) zimbra-logger: Enabled
7) zimbra-spell: Enabled
8) Default Class of Service Configuration:
r) Start servers after configuration yes
s) Save config to file
x) Expand menu
q) Quit

Address unconfigured (**) items (? - help)

Store configuration
Vamos a entrar en el menú 4 para cambiar la password de administrador de zimbra:
Select, or 'r' for previous menu [r] 4
Y escribimos la contraseña que quieran:
Password for [email protected] (min 6 characters): [J2n_pVqSr9] PASSWORDQUEQUERAMOS
1) Status: Enabled
2) Create Admin User: yes
3) Admin user to create: [email protected]
4) Admin Password set
5) Anti-virus quarantine user: [email protected]
6) Enable automated spam training: yes
7) Spam training user: [email protected]
8) Non-spam(Ham) training user: [email protected]
9) SMTP host: zimbra8-rhel6.jorgedelacruz.es
10) Web server HTTP port: 80
11) Web server HTTPS port: 443
12) Web server mode: https
13) IMAP server port: 143
14) IMAP server SSL port: 993
15) POP server port: 110
16) POP server SSL port: 995
17) Use spell check server: yes
18) Spell server URL: http://zimbra8-rhel6.jorgedelacruz.es:7780/aspell.php
19) Configure for use with mail proxy: FALSE
20) Configure for use with web proxy: FALSE
21) Enable version update checks: TRUE
22) Enable version update notifications: TRUE
23) Version update notification email: [email protected]
24) Version update source email: [email protected]
Vamos a pulsar enter para volver al menú principal:
Select, or 'r' for previous menu [r] r

Main menu

1) Common Configuration:
2) zimbra-ldap: Enabled
3) zimbra-store: Enabled
4) zimbra-mta: Enabled
5) zimbra-snmp: Enabled
6) zimbra-logger: Enabled
7) zimbra-spell: Enabled
8) Default Class of Service Configuration:
r) Start servers after configuration yes
s) Save config to file
x) Expand menu
q) Quit
Si presionamos a aplicaremos los cambios:
*** CONFIGURATION COMPLETE - press 'a' to apply
Select from menu, or press 'a' to apply config (? - help) a
*** CONFIGURATION COMPLETE - press 'a' to apply
Select from menu, or press 'a' to apply config (? - help) a
Save configuration data to a file? [Yes]
Save config in file: [/opt/zimbra/config.10691]
Saving config in /opt/zimbra/config.10691...done.
The system will be modified - continue? [No] yes
Una vez hemos pulsado el yes arriba, la instalación comenzará a realizarse sin problemas:
Operations logged to /tmp/zmsetup.03232014-044656.log
Setting local config values...done.
Initializing core config...Setting up CA...done.
Deploying CA to /opt/zimbra/conf/ca ...done.
Creating SSL zimbra-store certificate...done.
Creating new zimbra-ldap SSL certificate...done.
Creating new zimbra-mta SSL certificate...done.
Installing mailboxd SSL certificates...done.
Installing MTA SSL certificates...done.
Installing LDAP SSL certificate...done.
Initializing ldap...done.
Setting replication password...done.
Setting Postfix password...done.
Setting amavis password...done.
Setting nginx password...done.
Creating server entry for zimbra8-rhel6.jorgedelacruz.es...done.
Setting Zimbra IP Mode...done.
Saving CA in ldap ...done.
Saving SSL Certificate in ldap ...done.
Setting spell check URL...done.
Setting service ports on zimbra8-rhel6.jorgedelacruz.es...done.
Adding zimbra8-rhel6.jorgedelacruz.es to zimbraMailHostPool in default COS...done.
Setting zimbraFeatureTasksEnabled=TRUE...done.
Setting zimbraFeatureBriefcasesEnabled=FALSE...done.
Setting MTA auth host...done.
Setting TimeZone Preference...done.
Initializing mta config...done.
Setting services on zimbra8-rhel6.jorgedelacruz.es...done.
Creating domain zimbra8-rhel6.jorgedelacruz.es...done.
Setting default domain name...done.
Creating domain zimbra8-rhel6.jorgedelacruz.es...already exists.
Creating admin account [email protected].
Creating root alias...done.
Creating postmaster alias...done.
Creating user [email protected].
Creating user [email protected].
Creating user [email protected].
Setting spam training and Anti-virus quarantine accounts...done.
Initializing store sql database...done.
Setting zimbraSmtpHostname for zimbra8-rhel6.jorgedelacruz.es...done.
Configuring SNMP...done.
Setting up syslog.conf...done.
Starting servers...done.
Installing common zimlets...
com_zimbra_webex...done.
com_zimbra_date...done.
com_zimbra_phone...done.
com_zimbra_email...done.
com_zimbra_url...done.
com_zimbra_attachcontacts...done.
com_zimbra_adminversioncheck...done.
com_zimbra_bulkprovision...done.
com_zimbra_clientuploader...done.
com_zimbra_srchhighlighter...done.
com_zimbra_tooltip...done.
com_zimbra_viewmail...done.
com_zimbra_cert_manager...done.
com_zimbra_attachmail...done.
com_zimbra_ymemoticons...done.
com_zimbra_proxy_config...done.
Finished installing common zimlets.
Restarting mailboxd...done.
Creating galsync account for default domain...done.

You have the option of notifying Zimbra of your installation.
This helps us to track the uptake of the Zimbra Collaboration Server.
The only information that will be transmitted is:
The VERSION of zcs installed (8.0.6_GA_5922_RHEL6_64)
The ADMIN EMAIL ADDRESS created ([email protected])

Notify Zimbra of your installation? [Yes]

Configuration complete - press return to exit
Siempre está bien notificar a Zimbra que hemos instalado su producto, de esta manera se pueden hacer mejores estudios de mercado y seguir progresando.
4.1.- Firewall de Red Hat
Una opción que tenemos, es deshabilitarlo, pero desde aquí no lo recomiendo, simplemente siguiendo estos pasos en nuestro Red Hat, tendremos un servidor Zimbra securizado a nivel de red:
La configuración en bruto de iptables se guarda en /etc/sysconfig/iptables, con lo que haremos un vi a este fichero e introduciremos lo siguiente:
# Configuración de Firewall esrita por jorgedelacruz.es
# Manual customization of this file is not recommended.
*filter
:INPUT ACCEPT [0:0]
:FORWARD ACCEPT [0:0]
:OUTPUT ACCEPT [0:0]
-A INPUT -m state --state ESTABLISHED,RELATED -j ACCEPT
-A INPUT -p icmp -j ACCEPT
-A INPUT -i lo -j ACCEPT
-A INPUT -m state --state NEW -m tcp -p tcp --dport 22 -j ACCEPT
-A INPUT -p tcp -m state --state NEW -m tcp --dport 25 -j ACCEPT
-A INPUT -p tcp -m state --state NEW -m tcp --dport 80 -j ACCEPT
-A INPUT -p tcp -m state --state NEW -m tcp --dport 110 -j ACCEPT
-A INPUT -p tcp -m state --state NEW -m tcp --dport 143 -j ACCEPT
-A INPUT -p tcp -m state --state NEW -m tcp --dport 443 -j ACCEPT
-A INPUT -p tcp -m state --state NEW -m tcp --dport 456 -j ACCEPT
-A INPUT -p tcp -m state --state NEW -m tcp --dport 587 -j ACCEPT
-A INPUT -p tcp -m state --state NEW -m tcp --dport 993 -j ACCEPT
-A INPUT -p tcp -m state --state NEW -m tcp --dport 995 -j ACCEPT
-A INPUT -p tcp -m state --state NEW -m tcp --dport 7071 -j ACCEPT
-A INPUT -j REJECT --reject-with icmp-host-prohibited
-A FORWARD -j REJECT --reject-with icmp-host-prohibited
COMMIT
Nos aseguraremos que nuestro script de iptables arranca con el Sistema Operativo
# chkconfig --level 345 iptables on
Y reiniciamos los servicios para que aplique los cambios
/etc/init.d/iptables restart
Vía Carles Pla: Recomiendo encarecidamente desactivar SElinux, aveces suele dar algún problema:
Primero comprobamos si esta Activo:
[root@carles ~]# getenforce
 Disabled
Si no lo desactivamos:
[root@carles ~]# setenforce 0
Finalmente editamos la configuración:
vim /etc/selinux/config
y modificamos el campo
SELINUX=enforcing a SELINUX=disabled
reiniciamos el SO, y voilà, ya está. Comentar que esto también sirve en CentOS
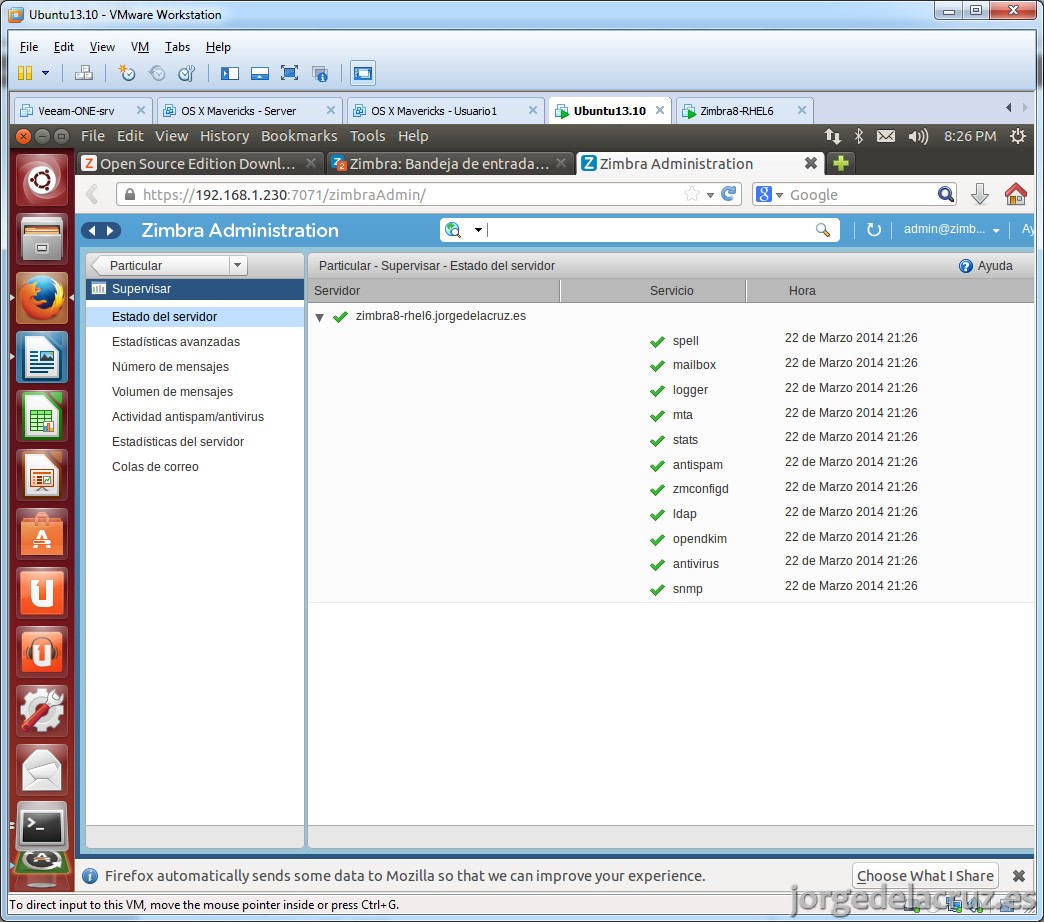
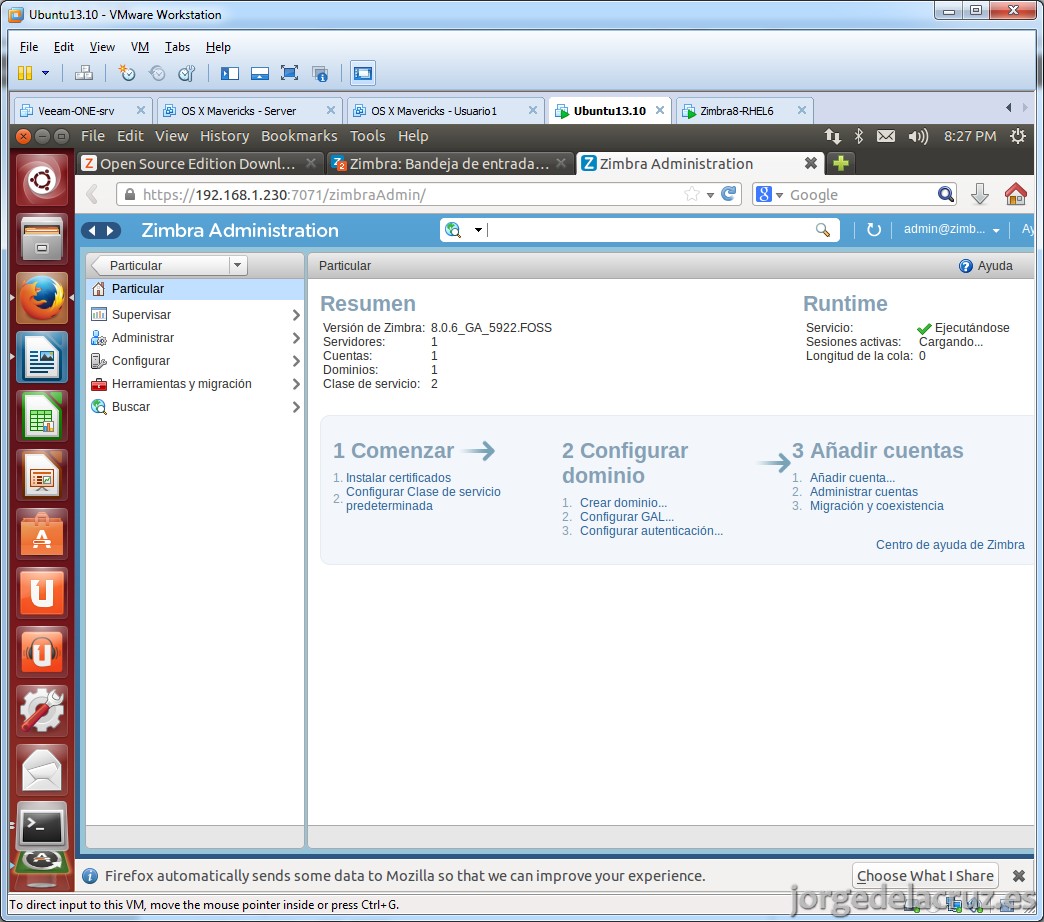
5.- Visualizando el nuevo Panel de Control
Lo primero que pensamos al entrar en el nuevo panel de control es que VMware ha intentado unificar todos sus productos y sus formularios login, sin duda nos recuerda a la interfaz Horizon.
Para acceder tendremos que irnos a la siguiente URL > https://midominio.com:7071
6.- Visualizando la nueva interfaz Ajax
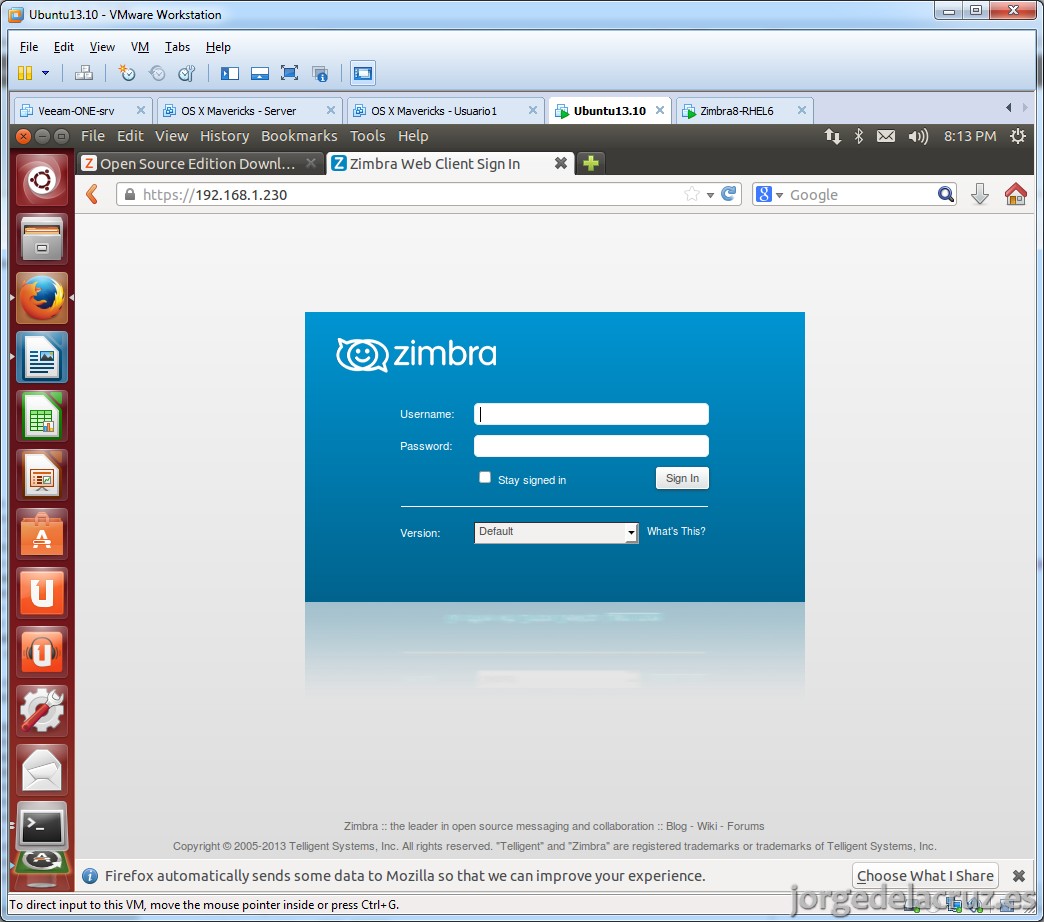
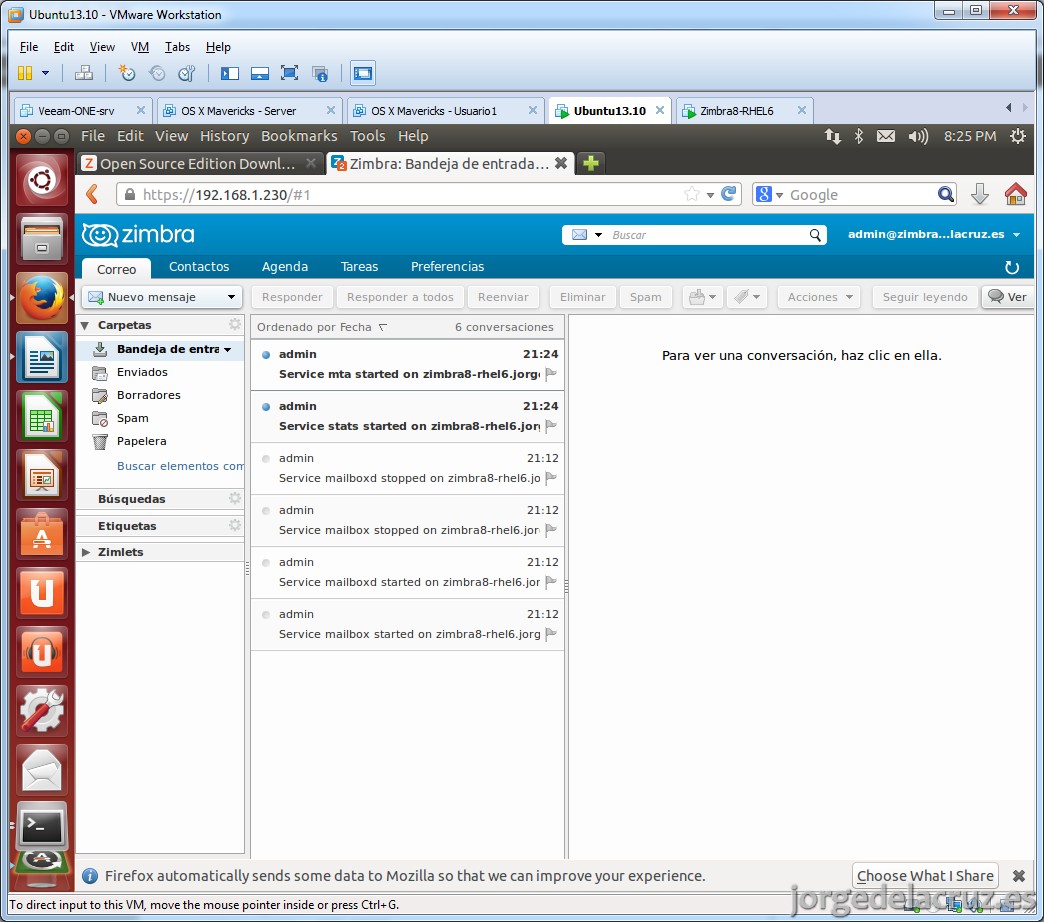
Pero sin duda algo ha sufrido cambios de esta versión es sin duda la interfaz de cliente, a la que se ha añadido unas mejoras, que aunque puedan parecer sutiles, son realmente una novedad muy grande y ahorros de tiempo enormes y de productividad.
Para entrar en la interfaz de usuario iremos a la siguiente dirección > https://midominio.com o https://IPDELSERVERZIMBRA
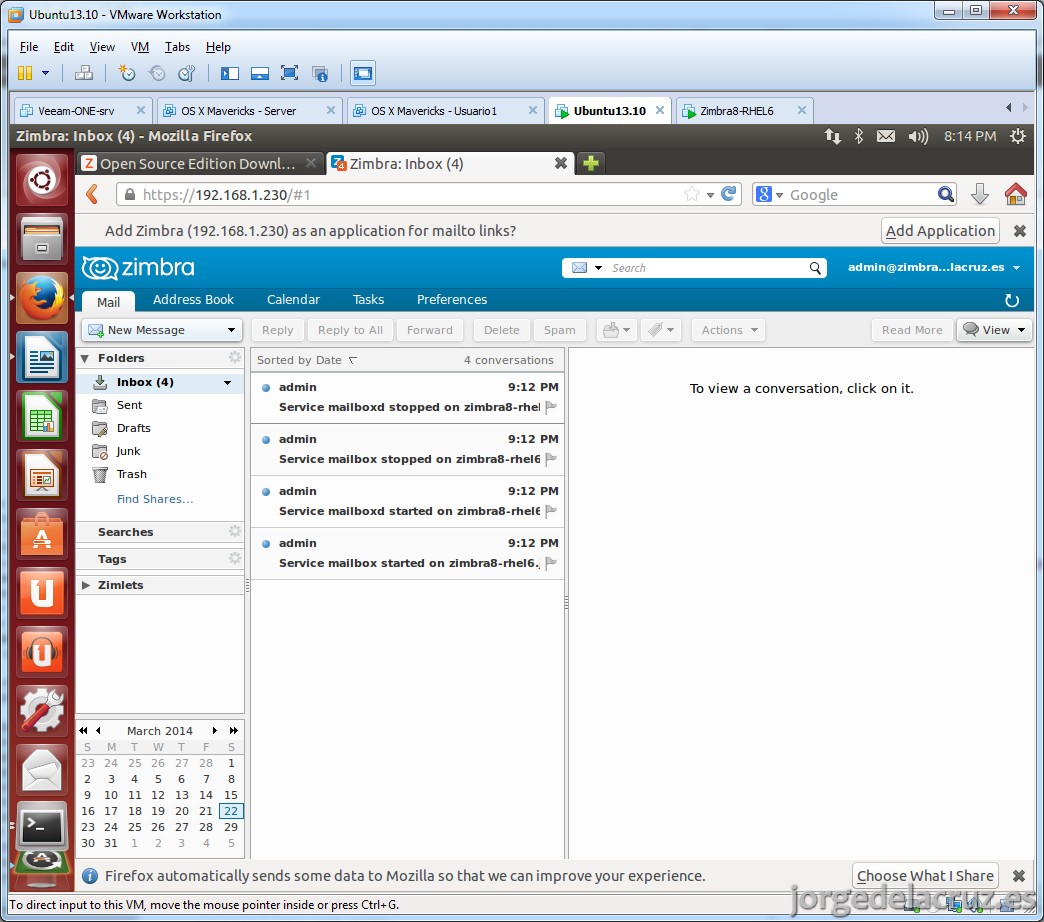
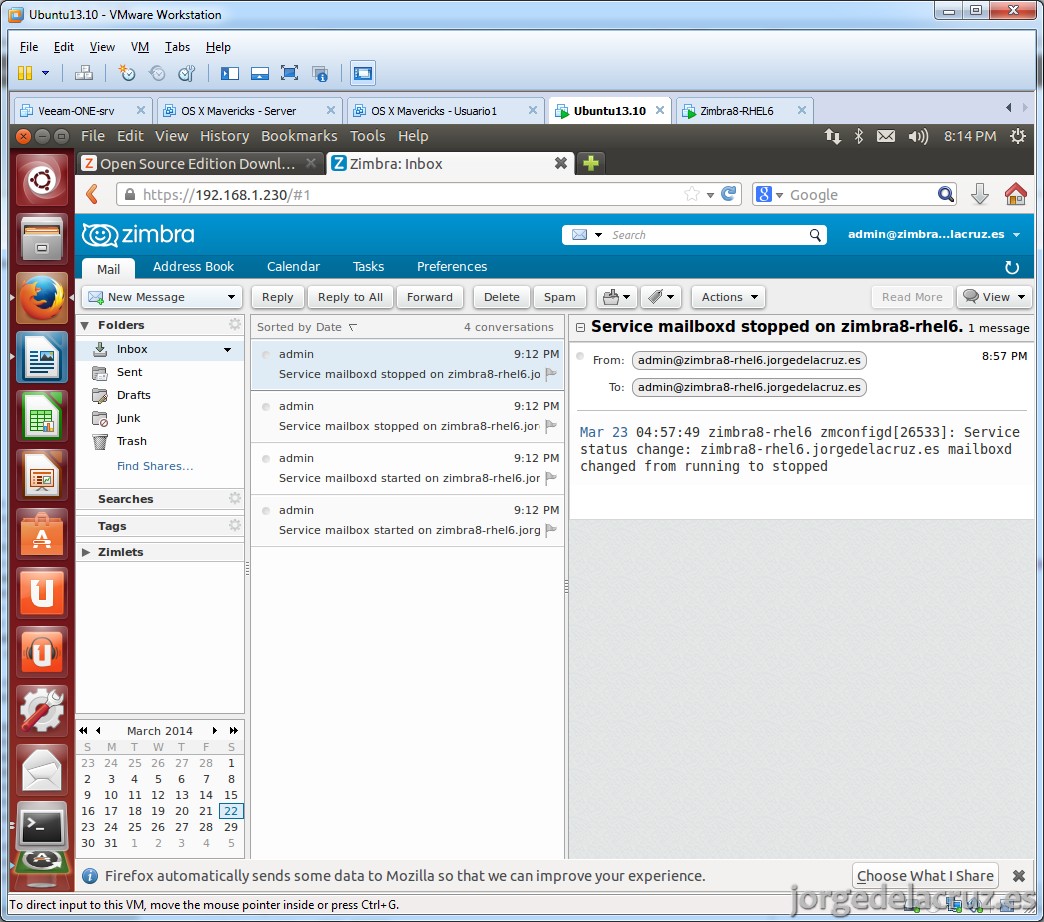
Probamos a crear un nuevo correo y adjuntar una imagen en formato attachment y embebebida, lo logramos en muy pocos pasos y muy rapido. Cabe destacar que el editor wysiwyg ha sido rediseñado pudiendo ahora embeber una imagen de manera muy sencilla, en la foto os dejo una foto con mi buen amigo BiGaS de La Quimera en Corto, y yo, detrás de la Casa Blanca. El correo me lo he mandado a mi mismo para ver como vemos este documento en nuestra bandeja de entrada.

El correo lo veremos de la siguiente manera, en formato completamente HTML en nuestro Inbox.

Otra bondad que me parece muy interesante, colorida y funcional, es ordenar los correos por Tags, etiquetas, nada nuevo, solo que en zimbra 8 nos permite que todo el contenido del Email cambié en la Bandeja de Entrada, pudiendo localizar los correos de una manera muy granular y elegante, observemos, solo con etiquetar los emails, ya se auto coloreará todo lo demas.

Para activar esta interesante funcionalidad tendremos que ir a Preferencias > Correo > Visualización de Mensajes y activar lo siguiente:

7.- Agregar funcionalidades de Maletin y S/MIME
Una de las cosas que nos llama la atención es no tener Maletín directamente, en este punto vamos a ver como habilitar el Maletín y las funciones de S/MIME en nuestro dominio.
Nos iremos hasta Configurar > Clase de Servicio > Y editamos la clase de Servicio que tengamos, en nuestro caso “default”

Marcaremos las casillas de Maletín y abajo del todo Activar S/MIME para activarlo en nuestro dominio.

Una vez hecho esto, podremos irnos de nuevo a nuestra interfaz y veremos estos dos cambios implementados, el primero nuestro Maletín, donde podremos visualizar la mayoría de documentos, imágenes, PDF, etc. Es cierto que para esta versión 8, ficheros de Suite Ofimática Microsoft, nos salta directamente un popup para abrirlos con nuestro software local. Y el segundo, el S/MIME, si tenemos licencia lo veremos activado al enviar un nuevo email, en modo Demo no podremos ejecutarlo.
8.- Zimbra Acceso Móvil
En el acceso móvil sólo han cambiado la pantalla de login, una pena la verdad ya que parecía que iban a integrar un cambio radical en este aspecto. Supongo que aprovecharán su aplicación exclusiva para móviles. Aquí algunas pantallas de la interfaz web móvil.


Por 7,36€ y en USA solamente por el momento, podremos adquirir la aplicación VMware Horizon Mail, una aplicación muy potente para Android, podéis comprarla aquí.
9.- Jugando a ser Dioses, modo flujo de actividad
Una de las mejores nuevas funciones es el Flujo de Actividad, nos permitirá mediante una serie de reglas avanzadas, realizar una serie de acciones avanzadas también. Veamos como activarlo. Nos iremos a Preferencias > Filtros > Filtros de flujo de actividad para activarlo. En la primera configuración ya podemos activar los dos checkbox que vemos en la imagen y quitarnos buena parte del correo de baja prioridad que recibimos diariamente.

Dentro de un Flujo podremos seleccionar entre todas estas posibilidades para categorizar nuestros emails, y tratar los que seleccionemos como baja prioridad, o alta, en caso que seleccionemos unos mails de determinadas personas o palabras concretas y le añadamos después una etiqueta, que anteriormente hemos puesto en rojo por ejemplo. Hay mil y un ejemplos para hacer del Flujo de Actividad, una extensión de como pensamos y como nos organizamos con nuestra herramienta más importante, el correo electrónico. 
10.- Conclusiones
Las conclusiones de Zimbra 8.0.6 sobre Red Hat son las siguientes:
- El soporte a nivel de Sistema Operativo de Red Hat, otorga a empresas de cierto volumen el requisito perfecto para implementar Zimbra Network Edition y Red Hat. De esta manera tenemos un producto de core de la empresa, como es el correo, licenciado y con soporte de ambos fabricantes.
- El rendimiento es similar a Ubuntu 12.04
- El modo Flujo de Actividad nos permitirá tener controlado todo nuestro buzón y hacer con los correos lo que queramos, literalmente. Digamos que tenemos un asistente las 24 horas del día echandonos una mano para saber si un correo es de alta prioridad o de baja.
- Traer soporte nativo para S/MIME es realmente muy bueno y nos permitirá securizar nuestro envio de emails de una manera mas sencilla.
- Punto negativo la interfaz web y el precio de la palicación para Android, y la restricción de USA.
Espero que os guste el artículo y si pensáis que os puede servir a vosotros o a alguien que conozcáis, difundirlo 🙂
Buenas, como siempre buen articulo, solo una pequeña apreciación o consejo. Recomiendo encarecidamente desactivar SElinux, aveces suele dar algún problema.
Primero comprobamos si esta Activo:
[root@carles ~]# getenforce
Disabled
Si no lo desactivamos:
[root@carles ~]# setenforce 0
Finalmente editamos la configuración:
vim /etc/selinux/config
y modificamos el campo SELINUX=enforcing a SELINUX=disabled
reiniciamos el SO, y voilà, ya está. Comentar que esto también sirve en CentOS
Así es Carles, lo olvidé en el tutorial, lo he incluido en el punto 4.1 haciendo referencia a tu comentario.
Muchas gracias por comentar, ¡un saludo!
Excelente este tutotial muy completo y sencillo,gracias por compartirlo,saludos
Muchas gracias Rene por tu aportación y comentario, estos comentarios nos ayudan a seguir muy ilusionados, sabiendo que os sirven. Un saludo
Hola Jorge muy bueno tu manual, pero tengo una duda y a lo mejor ayudar, cada vez que instalo mi zimbra y lo publico a internet me lo usan para mandar spam, que recomendaciones post instalación debo tener en cuenta
Buenas noches Alan,
Voy a preparar un post para estos días con esto.
Muy buena consulta.
Un saludo
Hola Jorge:
Felicidades por el artículo. Nosotros, cuando instalamos zimbra tenemos la sana costumbre de separar opt en un LV diferente en el LVM, por si hay que redimensionar y esas cosas.
Una pregunta, cuando hablas de S/MIME y de modo DEMO, ¿te refieres a que S/MIME solo está disponible para la network? Si no es así, ¿nos puedes aclarar que es modo DEMO?
Buenas tardes Manuel,
Si, en breve publicaremos un artículo de Buenas prácticas, ten en cuenta que los tutoriales y manuales aquí descritos, normalmente son para poder probar el entorno, no un Whitepaper de fabricante. Pero es verdad que incluir unas buenas prácticas de particionamiento, evitar openrelay, etc, siempre vienen bien para quien quiera seguirlas 🙂
Si, S/MIME solo funciona en Network Edition, o si tienes la demo de 60 días de trial de Network Edition, http://wiki.zimbra.com/wiki/SMIME_Certificates
Muchas gracias por vuestro comentario y muy chula vuestra web.
Hola jorge
como siempre muy buen manual, solo una cosa como en laboratorio esta muy bien, pero para produccion las particiones que crean suelen ser 50/50 entre raiz y el home y claro como el zimbra se instala por defecto en opt, creo que es buena idea editar las particiones y o bien crear solo un lvm para l raiz o poner mucha mas cantidad de espacio en opt
lo dicho muchas gracias por tus manuales y por la ayuda prestada
Un saludo
Buenas tardes Alberto,
Voy a modificar ambos manuales, el de Ubuntu y el de Red Hat para añadir este dato, para que ya que se siguen los pasos, nos quede un server decente. Muchas gracias por el comentario.
Un saludo
Un saludo Jorge, mi punto es el siguiente, instale zimbra servidor en centos, pude ver que el cliente zimbra es bueno, pero tiene algunos detalles que para ambiente empresarial no es el mas ideal, luego comentare los detalles, sin embargo por decreto presidencial, los equipos de computacion deben llevar CANAIMA 4.1 que trae consigo el cliente de correo evolucion y como principal Guacharo, la situacion es que cuando iniciamos el servicio, ok fino no habiamos tenido problemas en el enlace del Guacharo cliente apuntando al zimbra servidor, hemos notado que una vez ya migrado nuestros usuarios ha crecido la poblacion de usuarios en nuestro servidor de correo zimbra pero con el notamos ahora el siguiente problema; LATENCIA EN LA CONEXION del Guacharo con el servidor zimbra, el mensaje dice de hecho: ” se ha cortado la conexion con el servidor debido aparentemente a un problema en la red ” pasan unos segundos y a veces hasta 1 minuto y se restablece, va, viene, va viene, y asi esta y esto es ya a nivel de toda la red empresarial todos los equipos que fueron migrados y los que continuan siendo migrados a penas les instalamos el cliente correo fino pero una vez empieza a trabajar con toda la carga de correos de cada usuario viene el problema de latencia va y viene es mas el tiempo que dura sin conexion que con conexion, pienso que esto puede deberse a un problema con la red integrada del servidor de hecho algun problema electronico, algun problema con algun swich, algun ruteador, el cual se saturan los puertos bien sea del servidor o del swich, muchos piensan que es algo en la configuracion interna del guacharo, incluso se probo cambiar el condstond una configuracion interna de la programacion de guacharo, fue llevado de true a false, y nadaaaaaa, no hemos podido dar con la falla me gustaria una segunda opinion, apelando a tu experiencia, de antemano gracias….!
Saludos Guillermo,
Esto puede suceder por muchas cosas, que recursos tiene tu servidor Zimbra y cuantos usuarios tienes, cuantos usuarios tienes trabajando al mismo tiempo?
El servidor de Zimbra tiene proxy y memcached instalado? Tienes el entorno distribuido en varios servidores o solamente uno?
Puedes pegarme el resultado de zmcontrol -v como usuario zimbra en Consola?
Un saludo
Saludos, ya instale mi servidor en zimbra en centos 6.7 pues tengo muchas dudas
1. como instalo mi servidor con una ip publica directo.
2. 127.0.0.1 localhost localhost.localdomain
#::1 localhost localhost.localdomain localhost6 localhost6.localdomain6
192.168.1.129 centos01.linuxlab.local centos01
Como realizo esto ya en un entorno mas real que debo realizar apuntar un dominio que compre a mi ip publica de mi red?
Saludos, ya puedes usar tu server zimbra, simplemente necesitasun DNS publico y uno privado para que te resuelva por ejemplo dominio.com, el interno debe devolverte la IP interna, el publico debe devolver tu IP publica, a la que haces NAt hacia dentro.
Un saludo
Saludos Jorge.
Como haría todo el proceso ultimo del DNS publico y del DNS interno y el NAT hacia adentro.
Me ayudarías mucho con eso…
Estimado Jorge de la Cruz buenas tardes, deseo hacer la siguiente consulta.
En la empresa donde trabajo el correo de los jefes está con el app de correo de google, pero hay personal de mando bajo como tecnicos y otros. Y considerando que el precio por cada correo es de 50 dolares adicionales, deseo implementar un servidor de correo en Zimbra pero con el mismo dominio que actualmente se usa.
Deseo saber si se puede o no y que recomendación me darías.
Gracias, espero tu amable comentario.