
 Saludos amigos, durante muchos años, cambiar o añadir un certificado SSL a nuestro VMware vCenter ha sido un auténtico dolor, hay decenas de KB, y cientos de posts en la Comunidad con errores de todo tipo una vez que se coquetea con los pasos. Pero ya desde 6.7 en adelante parece que el proceso se ha simplificado un montón, con lo que hoy os vengo a mostrar los pasos para instalar vuestro propio Certificado SSL en VCSA, además gratuito creado con Let’s Encrypt.
Instalación de los requisitos del sistema (ACME)
Vamos a instalar certbot en una VM Linux que tengamos a mano, recomiendo no instalar nada en el VCSA mas que nada para mantener el soporte, etc.:
sudo apt-add-repository -r ppa:certbot/certbot
Esto nos permite tener los paquetes que necesitamos, actualizamos nuestros paquetes e instalamos:
sudo apt-get update
sudo apt install python-certbot-apache
Ya tenemos todo listo y podemos ir al siguiente paso.
Lanzar comando de acme para generar un Certificado SSL de Let’s Encrypt
Tenemos varias opciones de validación para solicitar el certificado SSL y que nos lo concedan, en este caso voy a utilizar el más simple, pero manual, que es utilizando el modo de DNS manual que nos dará un registro TXT que tenemos que poner en nuestro DNS público.
El comando a lanzar para solicitar el certificado SSL es el siguiente, estar atentos a cambiar vuestro FQDN de vuestro vCenter, y vuestro email para que os lleguen las alertas de cuando expira. Este comando sirve también cuando queráis renovar:
certbot --manual --preferred-challenges dns certonly -d vcsa.jorgedelacruz.es --staple-ocsp -m [email protected] --agree-tos --force-renewal
Esto nos mostrará un output similar a esto, responderemos Yes para que se almacene nuestra IP y tengan luego sus estadísticas:
Saving debug log to /var/log/letsencrypt/letsencrypt.log
Plugins selected: Authenticator manual, Installer None
Obtaining a new certificate
Performing the following challenges:
dns-01 challenge for vcsa.jorgedelacruz.es

- - - - - - - - - - - - - - - - - - - - - - - - - - - - - - - - - - - - - - - -
NOTE: The IP of this machine will be publicly logged as having requested this
certificate. If you're running certbot in manual mode on a machine that is not
your server, please ensure you're okay with that.

Are you OK with your IP being logged?
- - - - - - - - - - - - - - - - - - - - - - - - - - - - - - - - - - - - - - - -
(Y)es/(N)o: yes
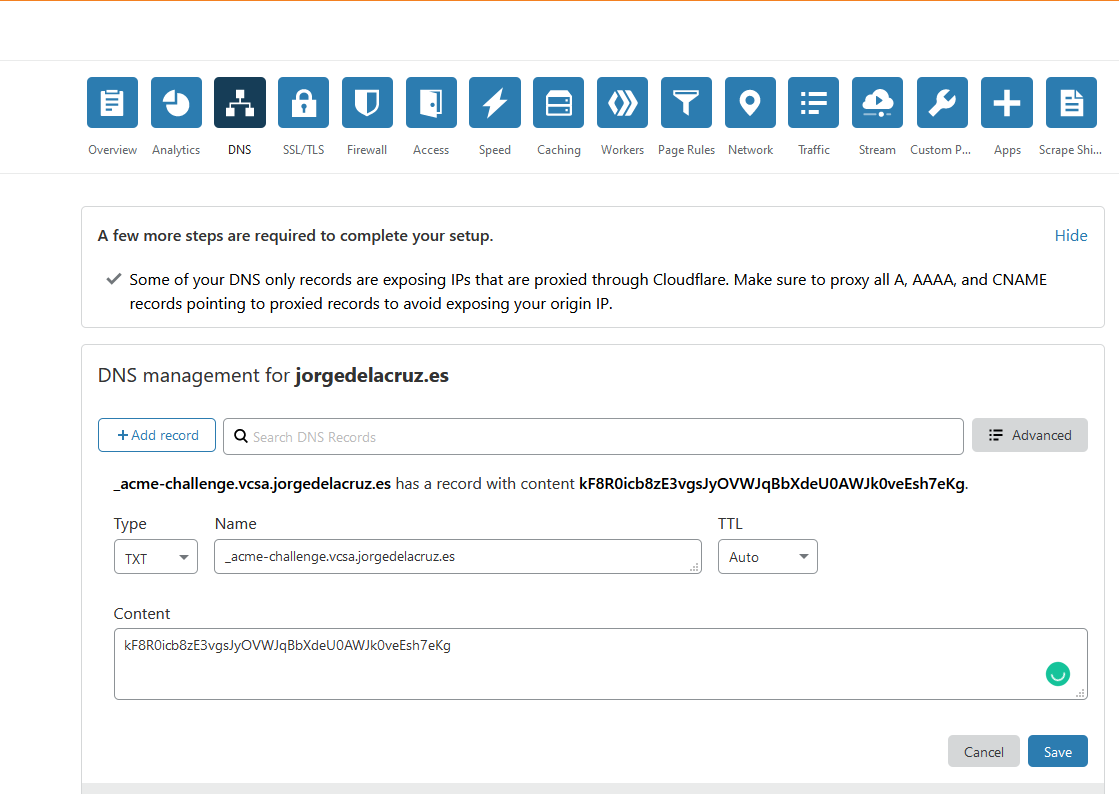
Una vez que presionamos yes, nos pedirá que creemos el siguiente TXT en nuestro DNS público:
- - - - - - - - - - - - - - - - - - - - - - - - - - - - - - - - - - - - - - - -
Please deploy a DNS TXT record under the name
_acme-challenge.vcsa.jorgedelacruz.es with the following value:

kF8R0icb8zE3vgsJyOVWJqBbXdeU0AWJk0veEsh7eKg

Before continuing, verify the record is deployed.
- - - - - - - - - - - - - - - - - - - - - - - - - - - - - - - - - - - - - - - -
Press Enter to Continue
Me voy a mi proveedor público de DNS y creo la entrada tal cuál me indica la consola:
 Ahora que tengo todo, me vuelvo a mi consola y presiono Enter, para ver que todo funciona y tengo mi certificado SSL:
Waiting for verification...
Cleaning up challenges

IMPORTANT NOTES:
- Congratulations! Your certificate and chain have been saved at:
/etc/letsencrypt/live/vcsa.jorgedelacruz.es/fullchain.pem
Your key file has been saved at:
/etc/letsencrypt/live/vcsa.jorgedelacruz.es/privkey.pem
Your cert will expire on 2021-04-09. To obtain a new or tweaked
version of this certificate in the future, simply run certbot
again. To non-interactively renew *all* of your certificates, run
"certbot renew"
- If you like Certbot, please consider supporting our work by:

Donating to ISRG / Let's Encrypt: https://letsencrypt.org/donate
Donating to EFF: https://eff.org/donate-le
Ubicar Certificado SSL en nuestro vCenter Appliance (VCSA)
Si habéis generado esto en otro Linux, como os dije, tendremos que crear dentro de nuestro VCSA tres ficheros: cert.pem, privkey.pem, y fullchain.pem.
Como podéis imaginar, incluir el contenido de /etc/letsencrypt/live/vcsa.jorgedelacruz.es/cert.pem dentro del nuevo fichero /root/cert.pem dentro de VCSA.
El contenido de /etc/letsencrypt/live/vcsa.jorgedelacruz.es/privkey.pem dentro de /root/privkey.pem
Y para crear un fullchain.pem válido en vCenter 7 seguir los siguientes pasos.
Crear un nuevo fullchain.pem válido para vCenter Server 7
Desde hace un tiempo parece que VMware se ha puesto un poco más tiquismiquis con las intermediate CA, etc. Con lo que el fullchain.pem que crea automáticamente Let’s Encrypt no nos sirve y nos dará error al desplegarlo, para que no tengamos problemas, tendremos que crear un nuevo fichero, yo le he llamado fullchain2021.pem
vi fullchain2021.pem
Y dentro he combinado el Intermediate Certificates Let’s Encrypt Authority X3 (IdenTrust cross-signed)
Junto con este fichero el DST Root CA X3 que podemos encontrar aquí:
Todo junto sería algo como lo siguiente:
-----BEGIN CERTIFICATE-----
MIIEkjCCA3qgAwIBAgIQCgFBQgAAAVOFc2oLheynCDANBgkqhkiG9w0BAQsFADA/
MSQwIgYDVQQKExtEaWdpdGFsIFNpZ25hdHVyZSBUcnVzdCBDby4xFzAVBgNVBAMT
DkRTVCBSb290IENBIFgzMB4XDTE2MDMxNzE2NDA0NloXDTIxMDMxNzE2NDA0Nlow
SjELMAkGA1UEBhMCVVMxFjAUBgNVBAoTDUxldCdzIEVuY3J5cHQxIzAhBgNVBAMT
GkxldCdzIEVuY3J5cHQgQXV0aG9yaXR5IFgzMIIBIjANBgkqhkiG9w0BAQEFAAOC
AQ8AMIIBCgKCAQEAnNMM8FrlLke3cl03g7NoYzDq1zUmGSXhvb418XCSL7e4S0EF
q6meNQhY7LEqxGiHC6PjdeTm86dicbp5gWAf15Gan/PQeGdxyGkOlZHP/uaZ6WA8
SMx+yk13EiSdRxta67nsHjcAHJyse6cF6s5K671B5TaYucv9bTyWaN8jKkKQDIZ0
Z8h/pZq4UmEUEz9l6YKHy9v6Dlb2honzhT+Xhq+w3Brvaw2VFn3EK6BlspkENnWA
a6xK8xuQSXgvopZPKiAlKQTGdMDQMc2PMTiVFrqoM7hD8bEfwzB/onkxEz0tNvjj
/PIzark5McWvxI0NHWQWM6r6hCm21AvA2H3DkwIDAQABo4IBfTCCAXkwEgYDVR0T
AQH/BAgwBgEB/wIBADAOBgNVHQ8BAf8EBAMCAYYwfwYIKwYBBQUHAQEEczBxMDIG
CCsGAQUFBzABhiZodHRwOi8vaXNyZy50cnVzdGlkLm9jc3AuaWRlbnRydXN0LmNv
bTA7BggrBgEFBQcwAoYvaHR0cDovL2FwcHMuaWRlbnRydXN0LmNvbS9yb290cy9k
c3Ryb290Y2F4My5wN2MwHwYDVR0jBBgwFoAUxKexpHsscfrb4UuQdf/EFWCFiRAw
VAYDVR0gBE0wSzAIBgZngQwBAgEwPwYLKwYBBAGC3xMBAQEwMDAuBggrBgEFBQcC
ARYiaHR0cDovL2Nwcy5yb290LXgxLmxldHNlbmNyeXB0Lm9yZzA8BgNVHR8ENTAz
MDGgL6AthitodHRwOi8vY3JsLmlkZW50cnVzdC5jb20vRFNUUk9PVENBWDNDUkwu
Y3JsMB0GA1UdDgQWBBSoSmpjBH3duubRObemRWXv86jsoTANBgkqhkiG9w0BAQsF
AAOCAQEA3TPXEfNjWDjdGBX7CVW+dla5cEilaUcne8IkCJLxWh9KEik3JHRRHGJo
uM2VcGfl96S8TihRzZvoroed6ti6WqEBmtzw3Wodatg+VyOeph4EYpr/1wXKtx8/
wApIvJSwtmVi4MFU5aMqrSDE6ea73Mj2tcMyo5jMd6jmeWUHK8so/joWUoHOUgwu
X4Po1QYz+3dszkDqMp4fklxBwXRsW10KXzPMTZ+sOPAveyxindmjkW8lGy+QsRlG
PfZ+G6Z6h7mjem0Y+iWlkYcV4PIWL1iwBi8saCbGS5jN2p8M+X+Q7UNKEkROb3N6
KOqkqm57TH2H3eDJAkSnh6/DNFu0Qg==
-----END CERTIFICATE-----
-----BEGIN CERTIFICATE-----
MIIDSjCCAjKgAwIBAgIQRK+wgNajJ7qJMDmGLvhAazANBgkqhkiG9w0BAQUFADA/
MSQwIgYDVQQKExtEaWdpdGFsIFNpZ25hdHVyZSBUcnVzdCBDby4xFzAVBgNVBAMT
DkRTVCBSb290IENBIFgzMB4XDTAwMDkzMDIxMTIxOVoXDTIxMDkzMDE0MDExNVow
PzEkMCIGA1UEChMbRGlnaXRhbCBTaWduYXR1cmUgVHJ1c3QgQ28uMRcwFQYDVQQD
Ew5EU1QgUm9vdCBDQSBYMzCCASIwDQYJKoZIhvcNAQEBBQADggEPADCCAQoCggEB
AN+v6ZdQCINXtMxiZfaQguzH0yxrMMpb7NnDfcdAwRgUi+DoM3ZJKuM/IUmTrE4O
rz5Iy2Xu/NMhD2XSKtkyj4zl93ewEnu1lcCJo6m67XMuegwGMoOifooUMM0RoOEq
OLl5CjH9UL2AZd+3UWODyOKIYepLYYHsUmu5ouJLGiifSKOeDNoJjj4XLh7dIN9b
xiqKqy69cK3FCxolkHRyxXtqqzTWMIn/5WgTe1QLyNau7Fqckh49ZLOMxt+/yUFw
7BZy1SbsOFU5Q9D8/RhcQPGX69Wam40dutolucbY38EVAjqr2m7xPi71XAicPNaD
aeQQmxkqtilX4+U9m5/wAl0CAwEAAaNCMEAwDwYDVR0TAQH/BAUwAwEB/zAOBgNV
HQ8BAf8EBAMCAQYwHQYDVR0OBBYEFMSnsaR7LHH62+FLkHX/xBVghYkQMA0GCSqG
SIb3DQEBBQUAA4IBAQCjGiybFwBcqR7uKGY3Or+Dxz9LwwmglSBd49lZRNI+DT69
ikugdB/OEIKcdBodfpga3csTS7MgROSR6cz8faXbauX+5v3gTt23ADq1cEmv8uXr
AvHRAosZy5Q6XkjEGB5YGV8eAlrwDPGxrancWYaLbumR9YbK+rlmM6pZW87ipxZz
R8srzJmwN0jP41ZL9c8PDHIyh8bwRLtTcm1D9SZImlJnt1ir/md2cXjbDaJWFBM5
JDGFoqgCWjBH4d1QB7wCCZAA62RjYJsWvIjJEubSfZGL+T0yjWW06XyxV3bqxbYo
Ob8VZRzI9neWagqNdwvYkQsEjgfbKbYK7p2CNTUQ
-----END CERTIFICATE-----
Vale, ya estamos muy cerca del final, ya tenemos tres ficheros dentro de nuestro VCSA 7, en la carpeta root:
root@vcsa [ ~ ]# ls -la *.pem
-rw-r--r-- 1 root root 1862 Jan 9 11:26 cert.pem
-rw-r--r-- 1 root root 3448 Jan 9 11:27 fullchain2021.pem
-rw-r--r-- 1 root root 1704 Jan 9 11:27 privkey.pem
Instalar el Certificado SSL de Let’s Encrypt en VCSA con certificate-manager mediante shell
Como seguimos dentro de nuestro VCSA por shell, podemos hacer uso del nuevo certificate-manager que se incluye desde hace unas ediciones, para invocarlo tan simple como lanzar:
/usr/lib/vmware-vmca/bin/certificate-manager
Que nos mostrará el siguiente menú, presionaremos 1:
                 _ _ _ _ _ _ _ _ _ _ _ _ _ _ _ _ _ _ _ _ _ _ _ _ _ _ _ _ _ _ _ _ _ _ _
                |                                                                     |
                |      *** Welcome to the vSphere 6.8 Certificate Manager  ***        |
                |                                                                     |
                |                   -- Select Operation --                            |
                |                                                                     |
                |      1. Replace Machine SSL certificate with Custom Certificate     |
                |                                                                     |
                |      2. Replace VMCA Root certificate with Custom Signing           |
                |         Certificate and replace all Certificates                    |
                |                                                                     |
                |      3. Replace Machine SSL certificate with VMCA Certificate       |
                |                                                                     |
                |      4. Regenerate a new VMCA Root Certificate and                  |
                |         replace all certificates                                    |
                |                                                                     |
                |      5. Replace Solution user certificates with                     |
                |         Custom Certificate                                          |
                |         NOTE: Solution user certs will be deprecated in a future    |
                |         release of vCenter. Refer to release notes for more details.|
                |                                                                     |
                |      6. Replace Solution user certificates with VMCA certificates   |
                |                                                                     |
                |      7. Revert last performed operation by re-publishing old        |
                |         certificates                                                |
                |                                                                     |
                |      8. Reset all Certificates                                      |
                |_ _ _ _ _ _ _ _ _ _ _ _ _ _ _ _ _ _ _ _ _ _ _ _ _ _ _ _ _ _ _ _ _ _ _|
Note : Use Ctrl-D to exit.
Option[1 to 8]: 1
Esto nos solicitará unas credenciales con permisos para operar los Certificados SSL dentro de vsphere.local (o vuestro SSO), en mi caso voy a usar administrator:
Please provide valid SSO and VC privileged user credential to perform certificate operations.
Enter username [[email protected]]:
Enter password:
Ahora seleccionaremos la segunda opción para seleccionar nuestro propio Certificado SSL
1. Generate Certificate Signing Request(s) and Key(s) for Machine SSL certificate
2. Import custom certificate(s) and key(s) to replace existing Machine SSL certificate

Option [1 or 2]: 2
Please provide valid custom certificate for Machine SSL.
File : /root/cert.pem
Please provide valid custom key for Machine SSL.
File : /root/privkey.pem
Please provide the signing certificate of the Machine SSL certificate
File : /root/fullchain2.pem
Y ya seleccionaremos yes en ésta última pregunta, los servicios se reiniciarán automáticamente:
You are going to replace Machine SSL cert using custom cert
Continue operation : Option[Y/N] ? : y
Command Output: /root/cert.pem: OK

Get site nameCompleted [Replacing Machine SSL Cert...]
default-site
Lookup all services
Get service default-site:c528e353-4680-4885-9e07-6d1d5b5b632d
Don't update service default-site:c528e353-4680-4885-9e07-6d1d5b5b632d
Get service default-site:612774a5-5093-4eaa-892c-d5735d3af0fe
...
Get service 9ae1be99-aabd-47a5-bd9a-f97f74eaf78f_com.vmware.vcenter.wcp
Don't update service 9ae1be99-aabd-47a5-bd9a-f97f74eaf78f_com.vmware.vcenter.wcp
Updated 0 service(s)
Status : 100% Completed [All tasks completed successfully]
Comprobar que nuestro VCSA ya tiene el nuevo Certificado SSL válido
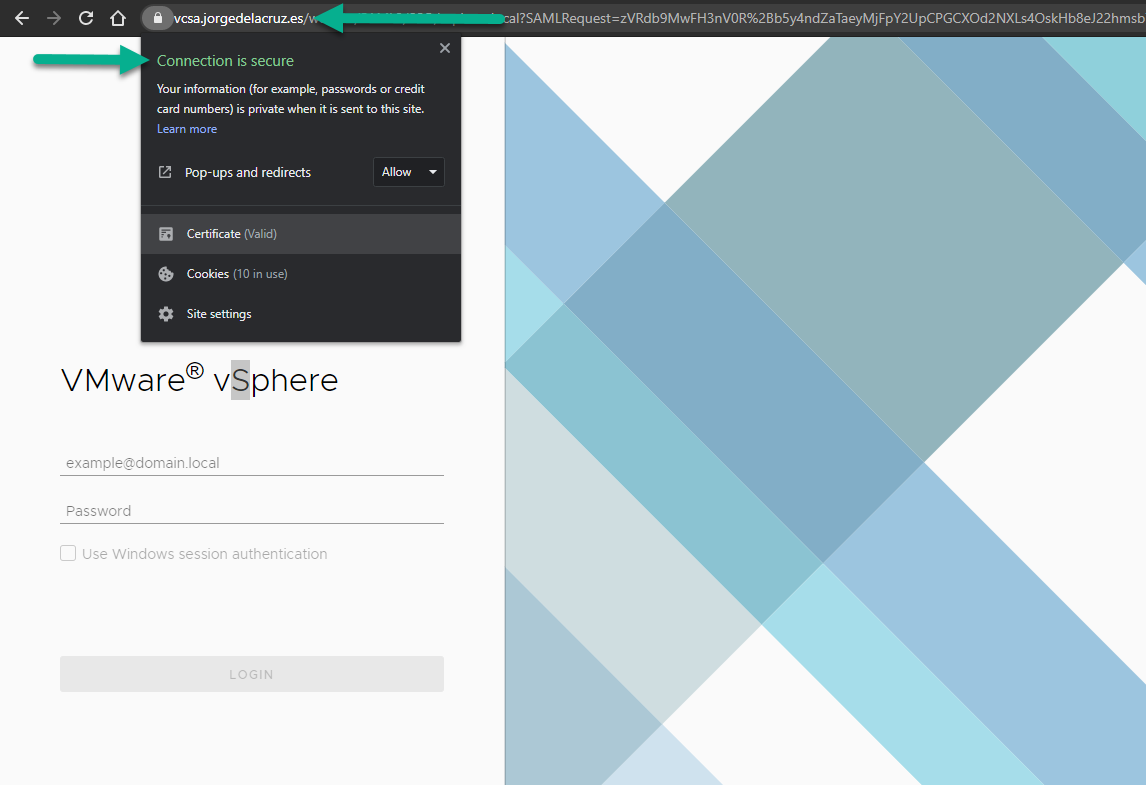
Ha llegado la hora de la verdad, nos iremos a nuestro vCenter, recordar que el certificado es válido solo para el FQDN, si accedéis por IP siempre saldrá que no es seguro, y si es el FQDN veremos el tan deseado candado verde:
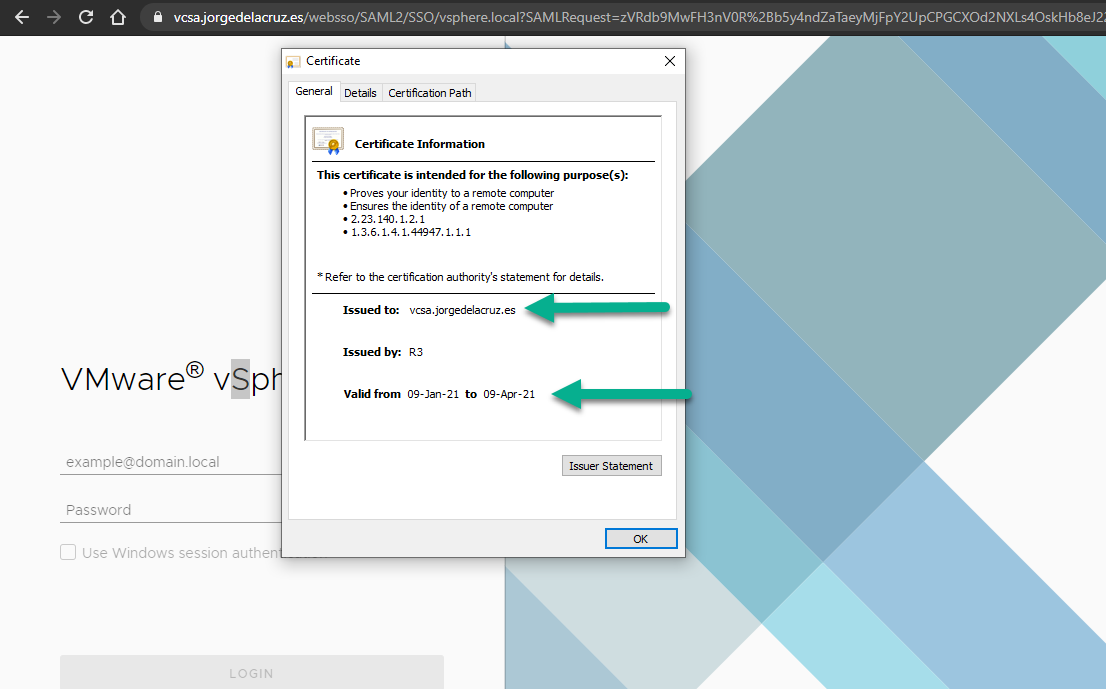
 Además, podremos ver cuando expira el certificado SSL, propiedades, etc.:
  Si queremos monitorizar nuestro Certificado SSL para ver cuando expira y que podamos renovarlo, tengo una entrada al respecto:
Eso es todo amigos, espero que os guste y os resulte útil. Un saludo enorme.
[…] https://www.jorgedelacruz.es/2021/01/11/vmware-securizar-nuestro-vcenter-server-7-vcsa-con-un-certif… […]